
“In the office” requests: setup and QR codes
A service of the “In the office” type handles tasks tied to a specific object: a socket by the desk is dead, the meeting room has run out of paper, a parking space needs cleaning. A request for such a service always carries the object, so the provider knows immediately where to go. This type has something the other two do not: a service mode. In public mode a request can be submitted without signing in — via a QR code stuck on the object itself.
When this type fits
The hint under the chips describes this type as: “Tasks related to physical office assets. For example: setup and repair of equipment, furniture and building systems, replacing printer consumables.” Pick it when the request always concerns a specific place and the provider needs to know which one.
An employee submits a request for such a service from the object information card: they click a desk, a parking space, a meeting room, an office or a point of interest on the map, open its information card and click “Request” in the row of actions at the bottom. The object is filled in automatically — you cannot pick a different one in the form. The second way is the QR code on the object itself, and it is available in public mode only.
Creating the service
What you need: the Super Administrator or Offices Administrator role; the “My requests” module enabled (Manage → Company settings → the “Available functionality” block); an employee to assign as the provider.
- Open Manage → Office management → the “Services” tab and click “Add service”.
- In the “Service type” block choose “In the office”.
- In the “Service mode” block that appears choose “Private” or “Public” — the difference is described below.
- In the “Where to process requests” block keep “Inside UnSpot” or choose “In external ticket system”.
- Fill in “Service” and, if useful, “Service description”.
- Fill in “Provider” — for processing inside UnSpot this field is required.
- Save the service. It appears in the table with “In the office” in the “Service type” column.
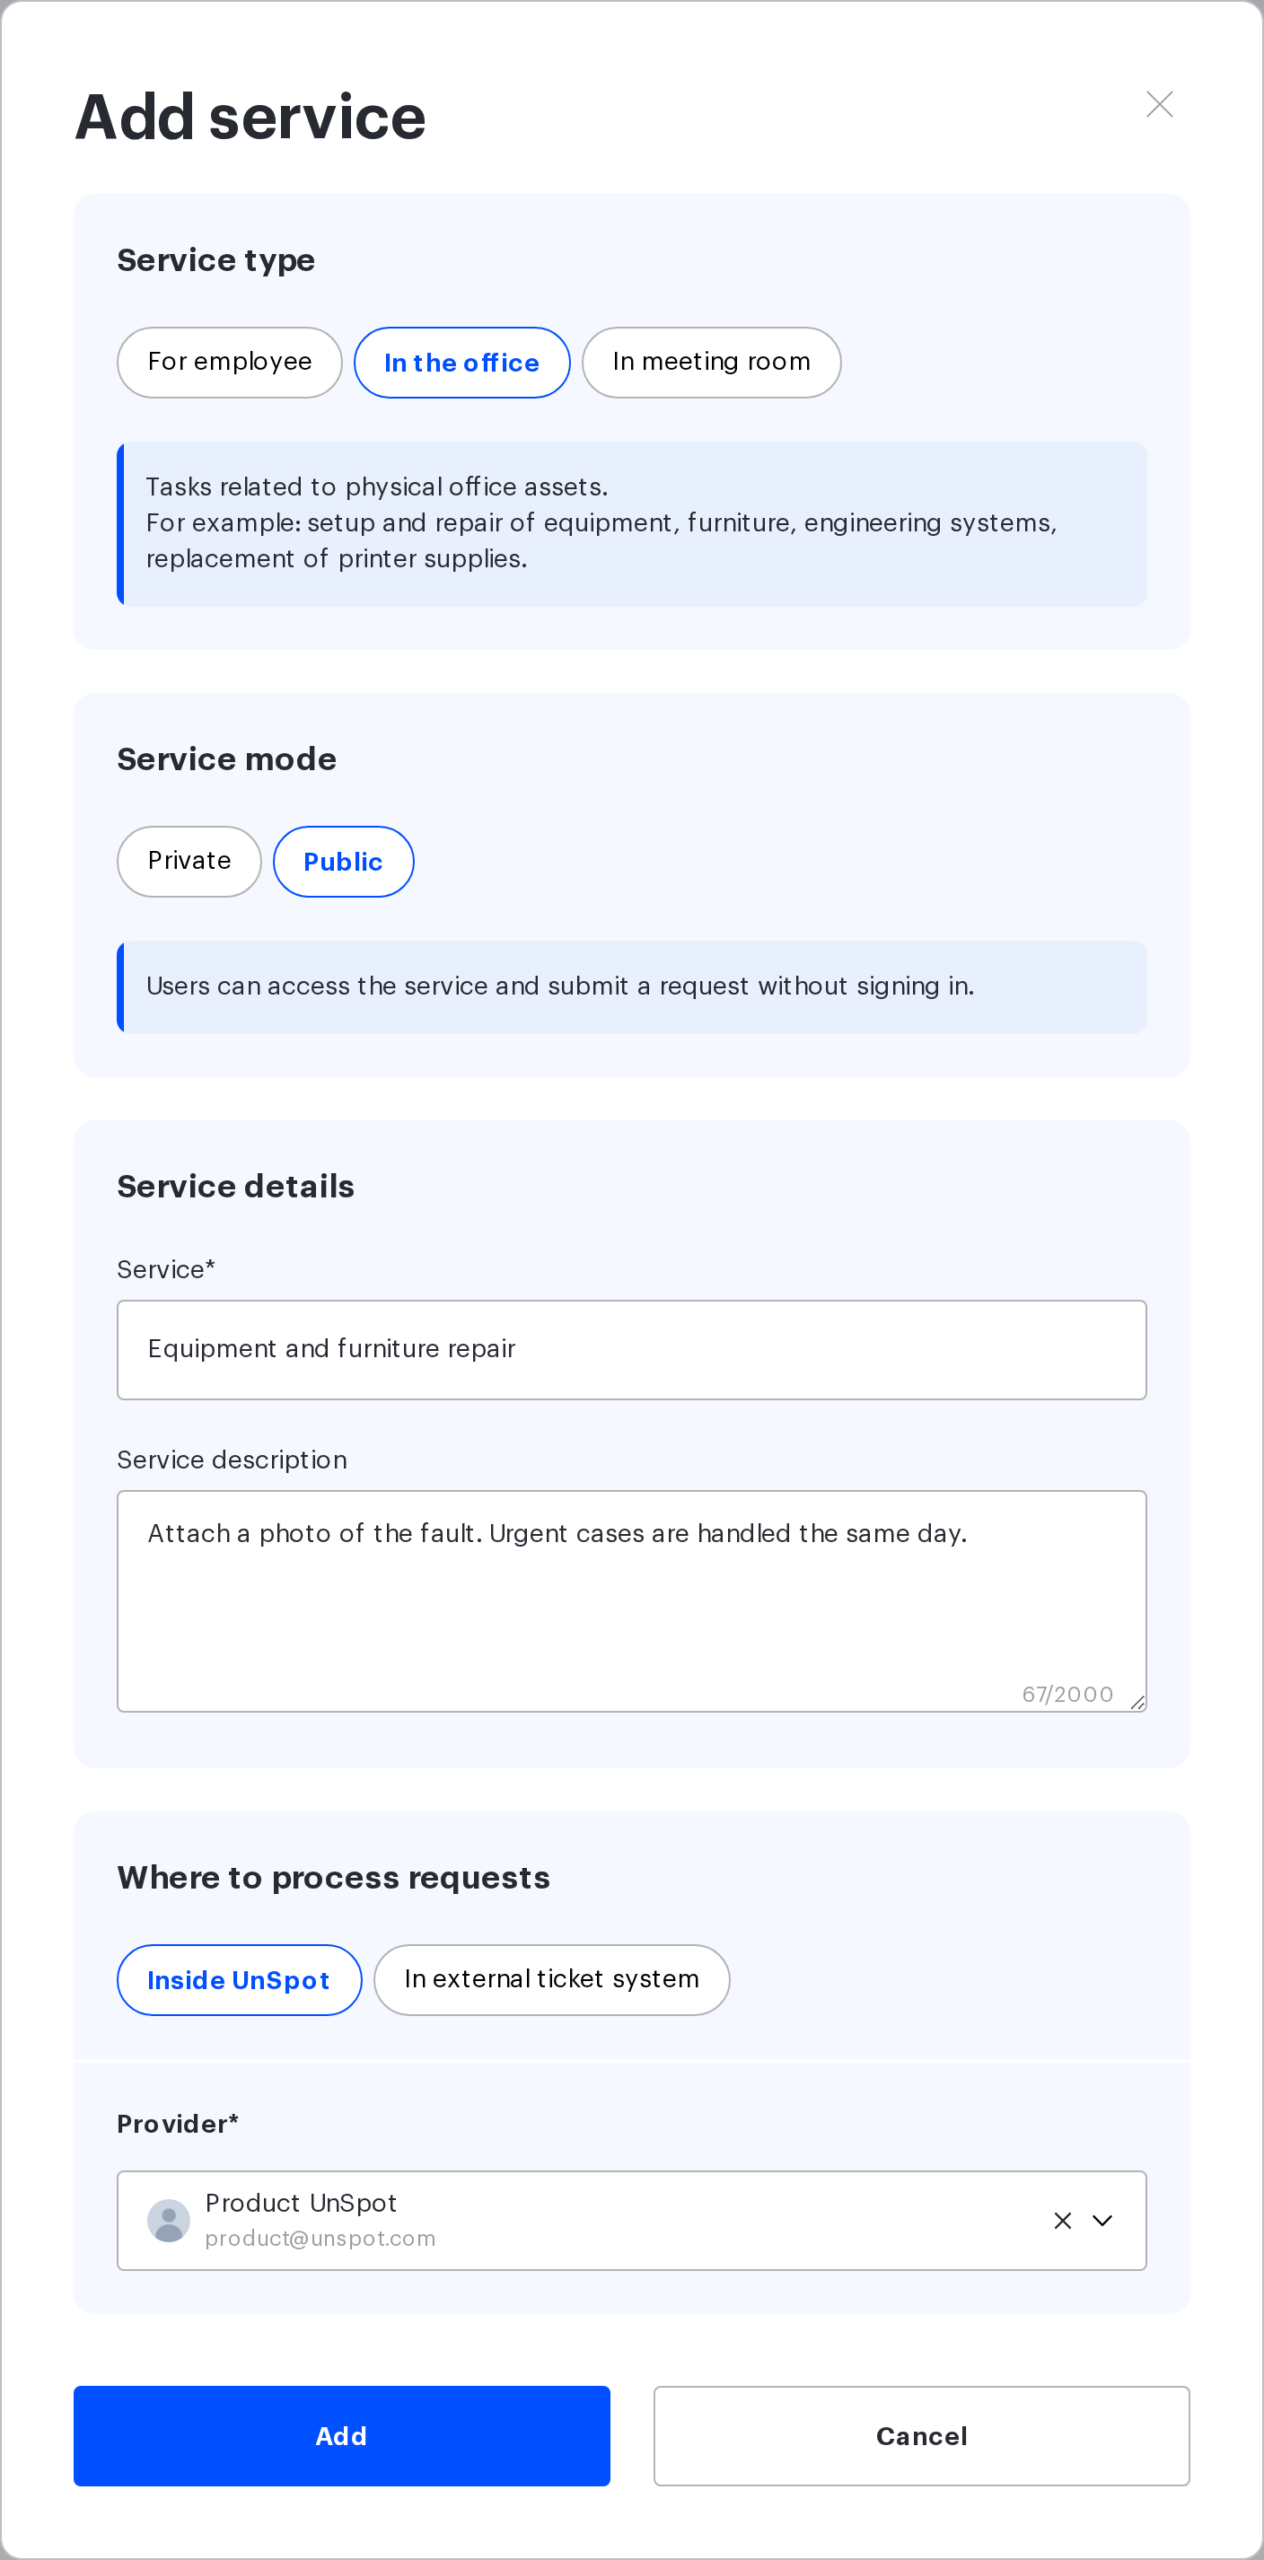
“Service type” and “Where to process requests” are set once and cannot be edited afterwards. In the edit form both chip groups are read-only. “Service mode”, on the other hand, can be changed at any time — it is the only one of the three switches that stays editable after saving.
Service mode: private and public
The “Service mode” block exists only for the “In the office” type. “For employee” and “In meeting room” services do not have it at all — there the request is always submitted by a signed-in employee.
| Mode | Hint in the interface | What it means in practice |
|---|---|---|
| “Private” | Users must sign in to access the service and submit a request. | The request is submitted from the object card in UnSpot only. The initiator is always known: they are shown in the request, receive status emails and can cancel their own request |
| “Public” | Users can access the service and submit a request without signing in. | Submission by QR code becomes available on top of that. Such requests are anonymous: they have no initiator |
Public mode does not mean “the service is visible to all employees” — it means “a request can be submitted without signing in”. You need it where requests come from people who have no UnSpot account: visitors, tenants, contractors, staff on production floors without work computers.
Which objects a request can name
Technically an “In the office” service accepts seven object types, but only five are usable: two have no entry point in the interface. QR codes are exported for the same five.
| Object | Request from the card on the map | QR code for the object |
|---|---|---|
| Desk | Yes | Yes |
| Parking space | Yes | Yes |
| Meeting room | Yes | Yes |
| Office | Yes | Yes |
| Point of interest | Yes | Yes |
| Locker | No | No |
| Locker cell | No | No |
Lockers and their cells are in the table on purpose: the service itself accepts such objects, but a request for them cannot be submitted from the interface. There is no request button on the locker and cell cards, and these resource types are absent from the QR export for service requests as well. If the task concerns a locker, file it as an office request or as a “For employee” request and name the locker in the description.
Exporting QR codes
QR codes are exported from the neighbouring tab of the same section: Manage → Office management → the “Resources report” tab.
- In the first list — labelled “Please select the type of report” — choose “QR codes of resources (service requests)”. Do not confuse it with its neighbours: “QR codes of resources (booking check-in)”, “(resource information)” and “(map location)” lead to other UnSpot screens, not to the request form.
- In the second list, select the offices. It is labelled “No space” — that is the placeholder of an empty field, not a ready value. Formally the field is optional, but without it the list comes back empty: see the warning below.
- In the third list — it appears after the report type is chosen and is labelled “Select the type of resource” — pick the resource type: “Desk”, “Parking space”, “Meeting room”, “Office” or “Points of interest”. This report has no “All” value; one type is exported at a time.
- Click “Generate report”. The table fills with resources of the selected type.
- Tick the rows you need — while nothing is selected, the “Download” button stays inactive.
- Click “Download”. The browser saves the archive qr-codes.zip.
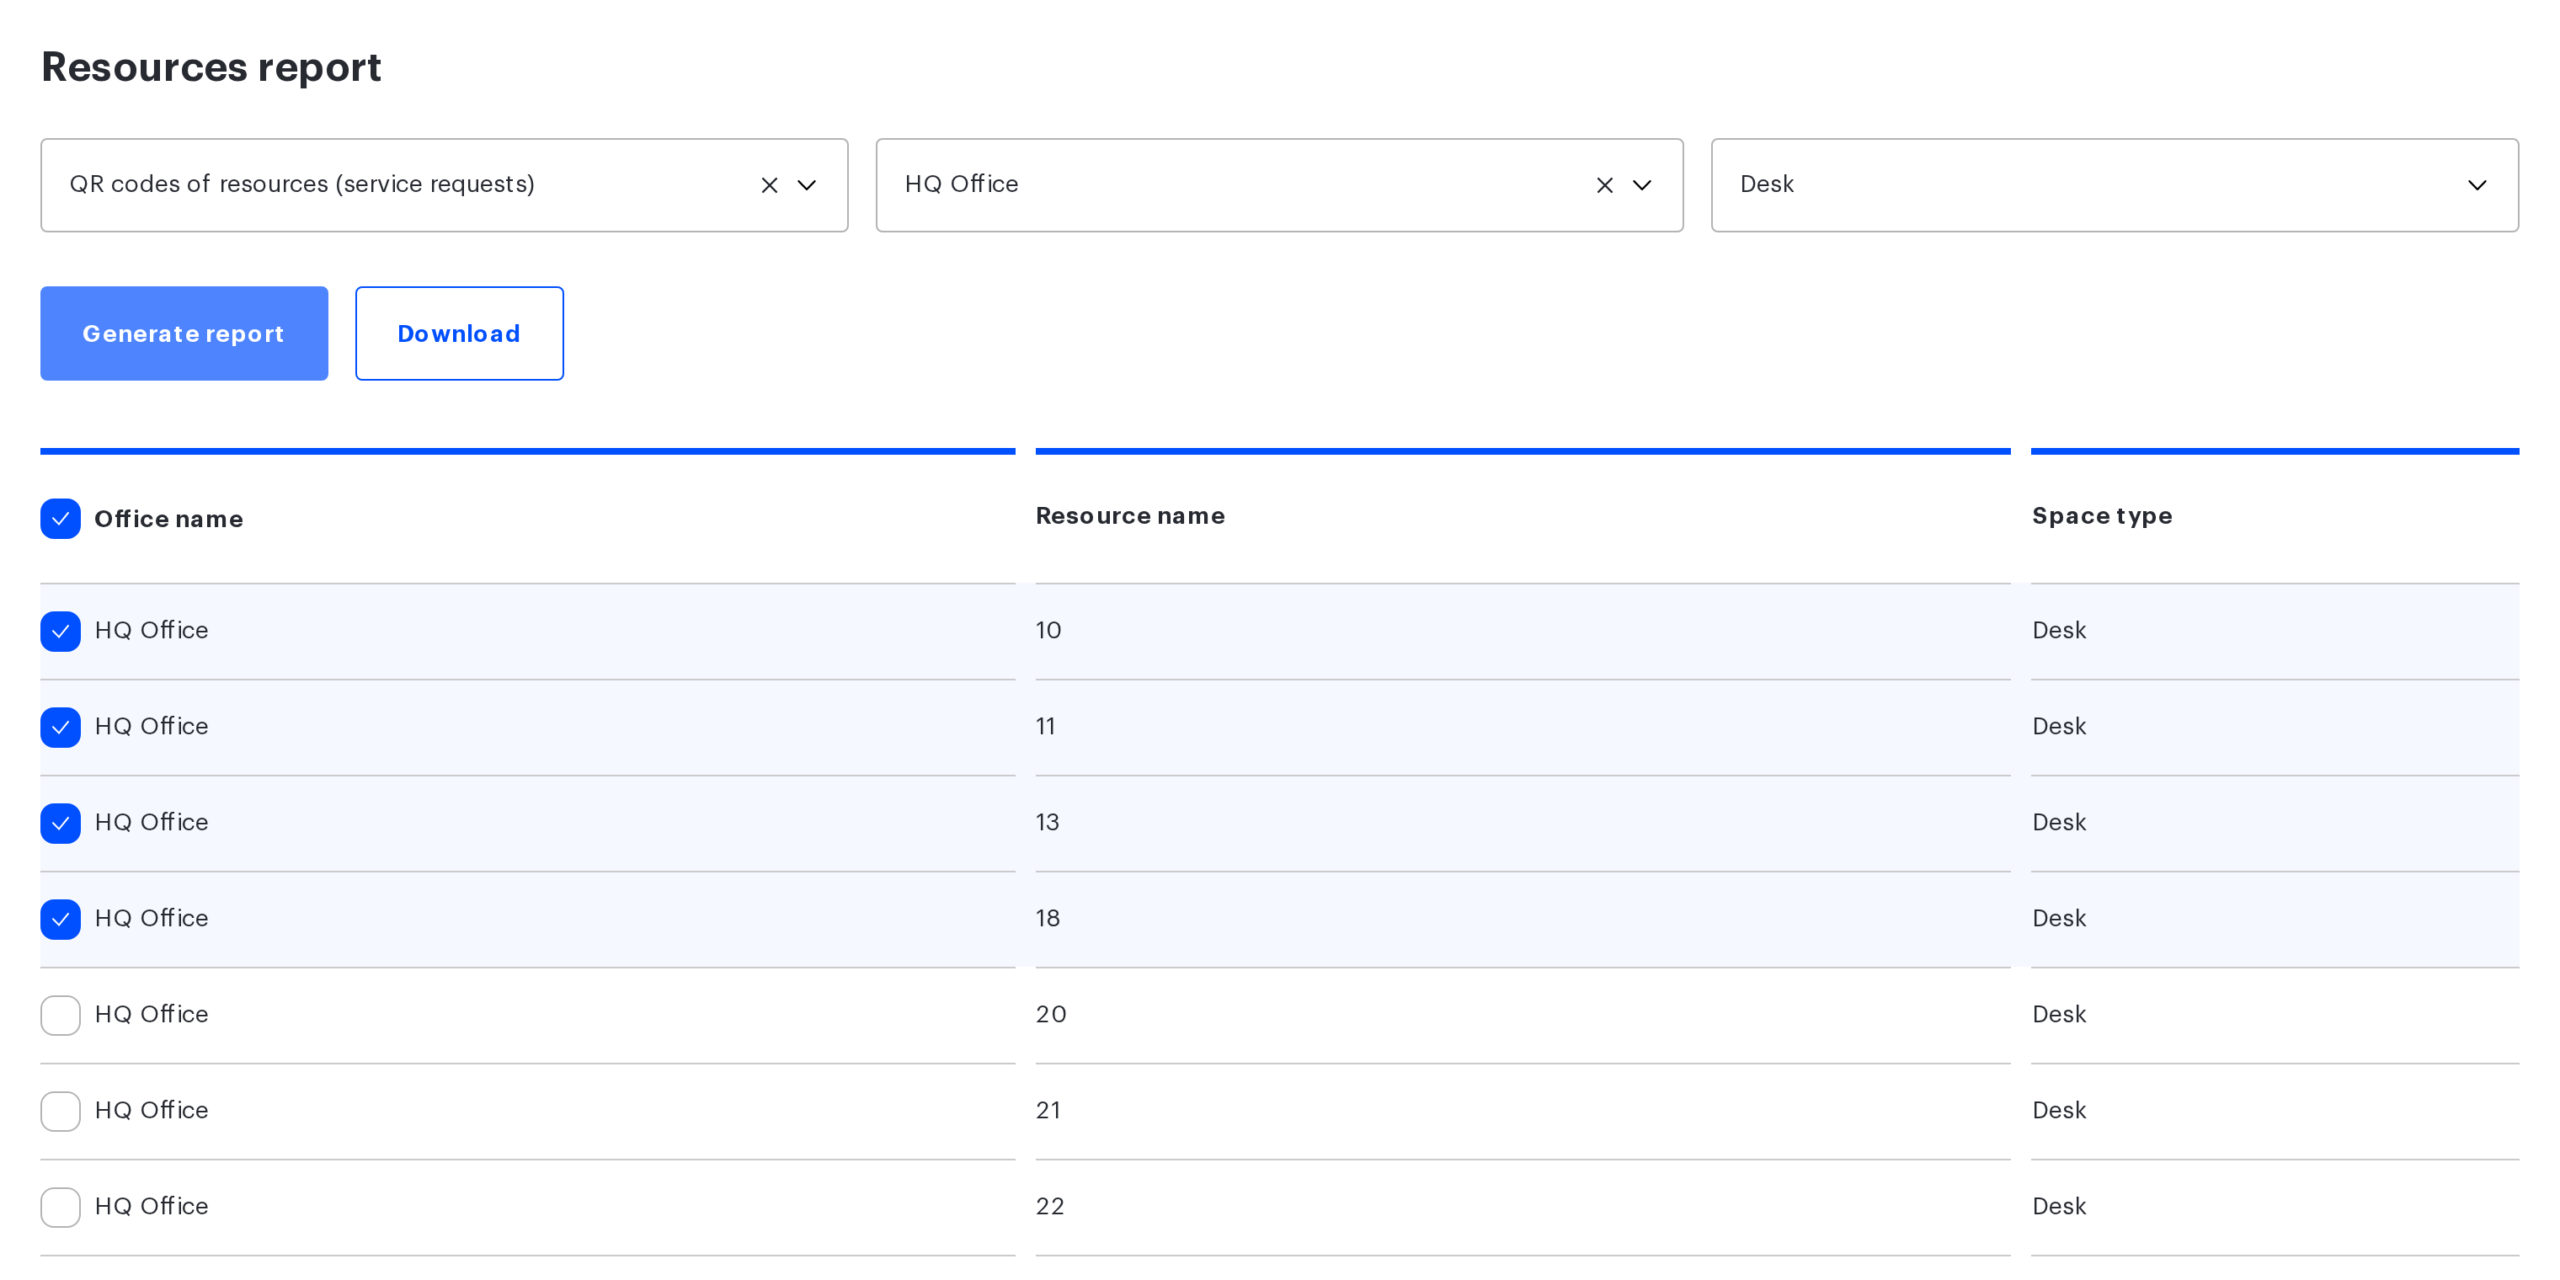
If no offices are selected, the table stays empty and UnSpot does not explain why. UnSpot does not mark required fields in advance: there is no asterisk and no highlight, and the message “This field is required” appears only under the two lists that really are required, and only after the button is clicked. The office filter is not one of them, so an empty result is easy to read as “there are no resources of this type”. For desks, parking spaces, offices and points of interest, nothing is returned without selected offices; for meeting rooms, only those that belong to no office are returned. The rule is simple: always select the offices.
Inside the archive, files are arranged in folders named after the offices, and the file name is {Type}_{Resource name}.svg. Top-level resources that have no parent office go into a folder with a service name made of a single underscore. If both the type and the name coincide inside one folder, a number is appended to the name: (2), (3) and so on; identical names in different offices do not collide, they sit in different folders. The sheet format is SVG: the card itself is vector, while the QR code inside it is raster, so do not scale the sheet beyond its original size when printing.
What is printed on a QR sheet
There are four elements on the sheet:
- a background with rounded corners;
- the resource name — in a large font, in the company brand colour if one is set in the settings;
- the QR code itself;
- the company logo from the settings, or the UnSpot logo if none is uploaded.
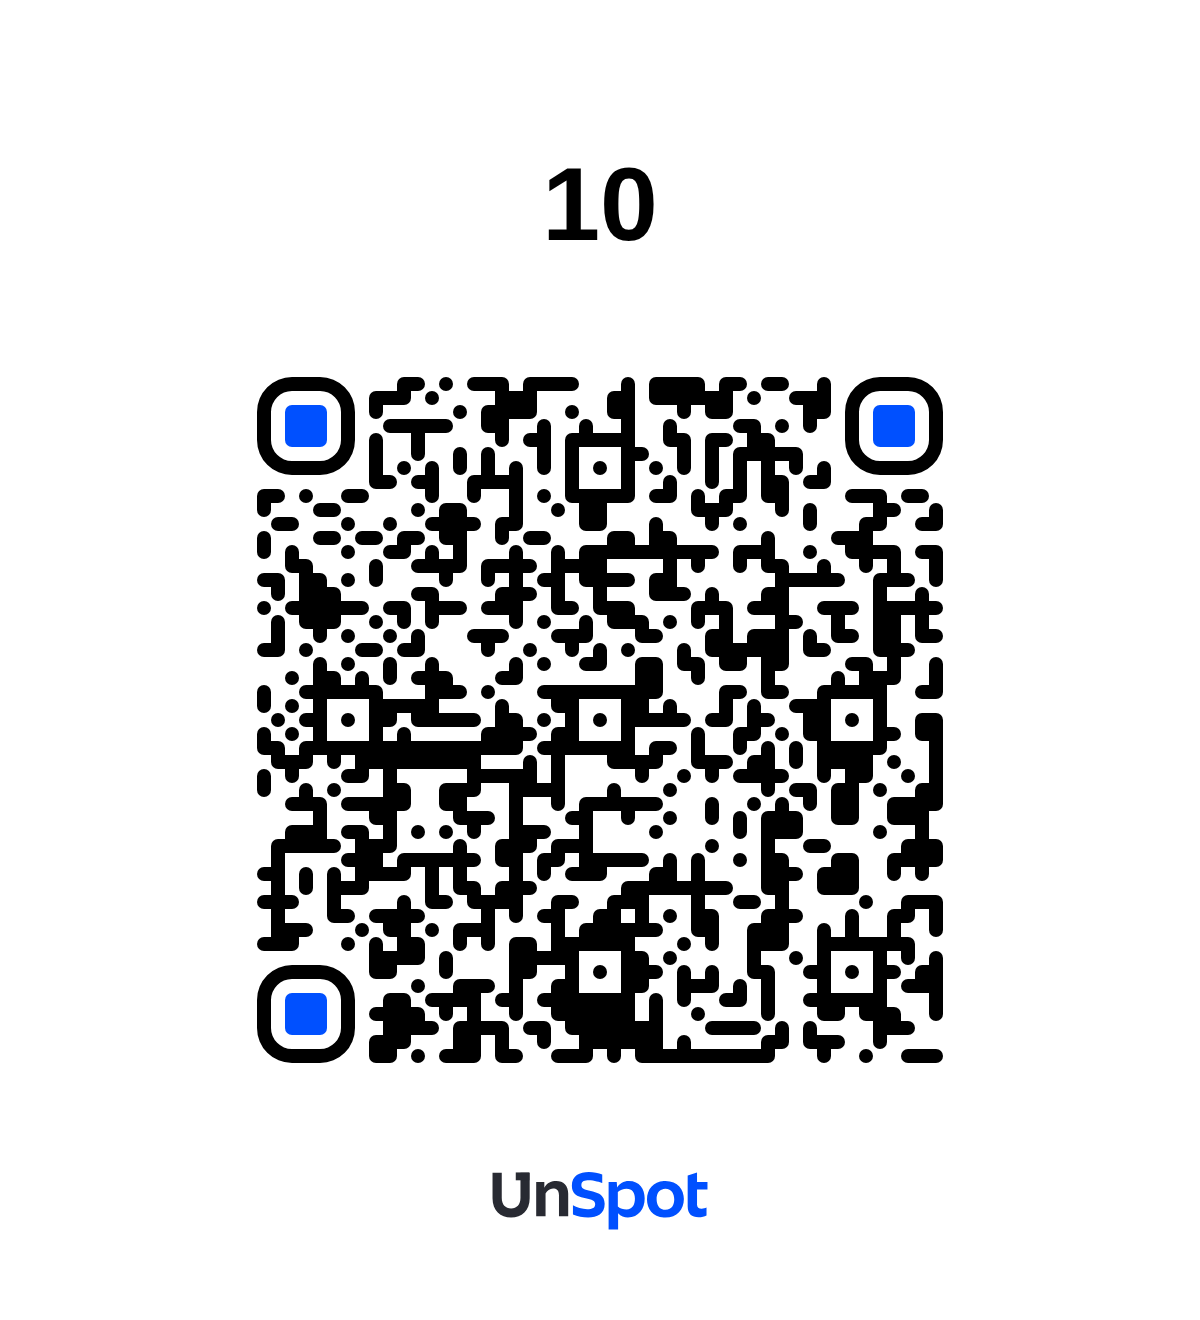
There is nothing else on the sheet — no office, no floor, no resource type, no link address, no export date. The type and the office exist only inside the archive: in the file name and the folder name. Once printed, that information is lost.
Hence a practical consequence: if different offices have resources with identical names, their sheets will be indistinguishable. Print batches office by office and do not mix them, and write the office and the floor on the back or on the packaging. More reliable still — give resources names that are unique across the whole company from the start.
The public request form
A QR code leads to the public request page. It opens without signing in and contains the object card, a service selector, a description field and file upload.
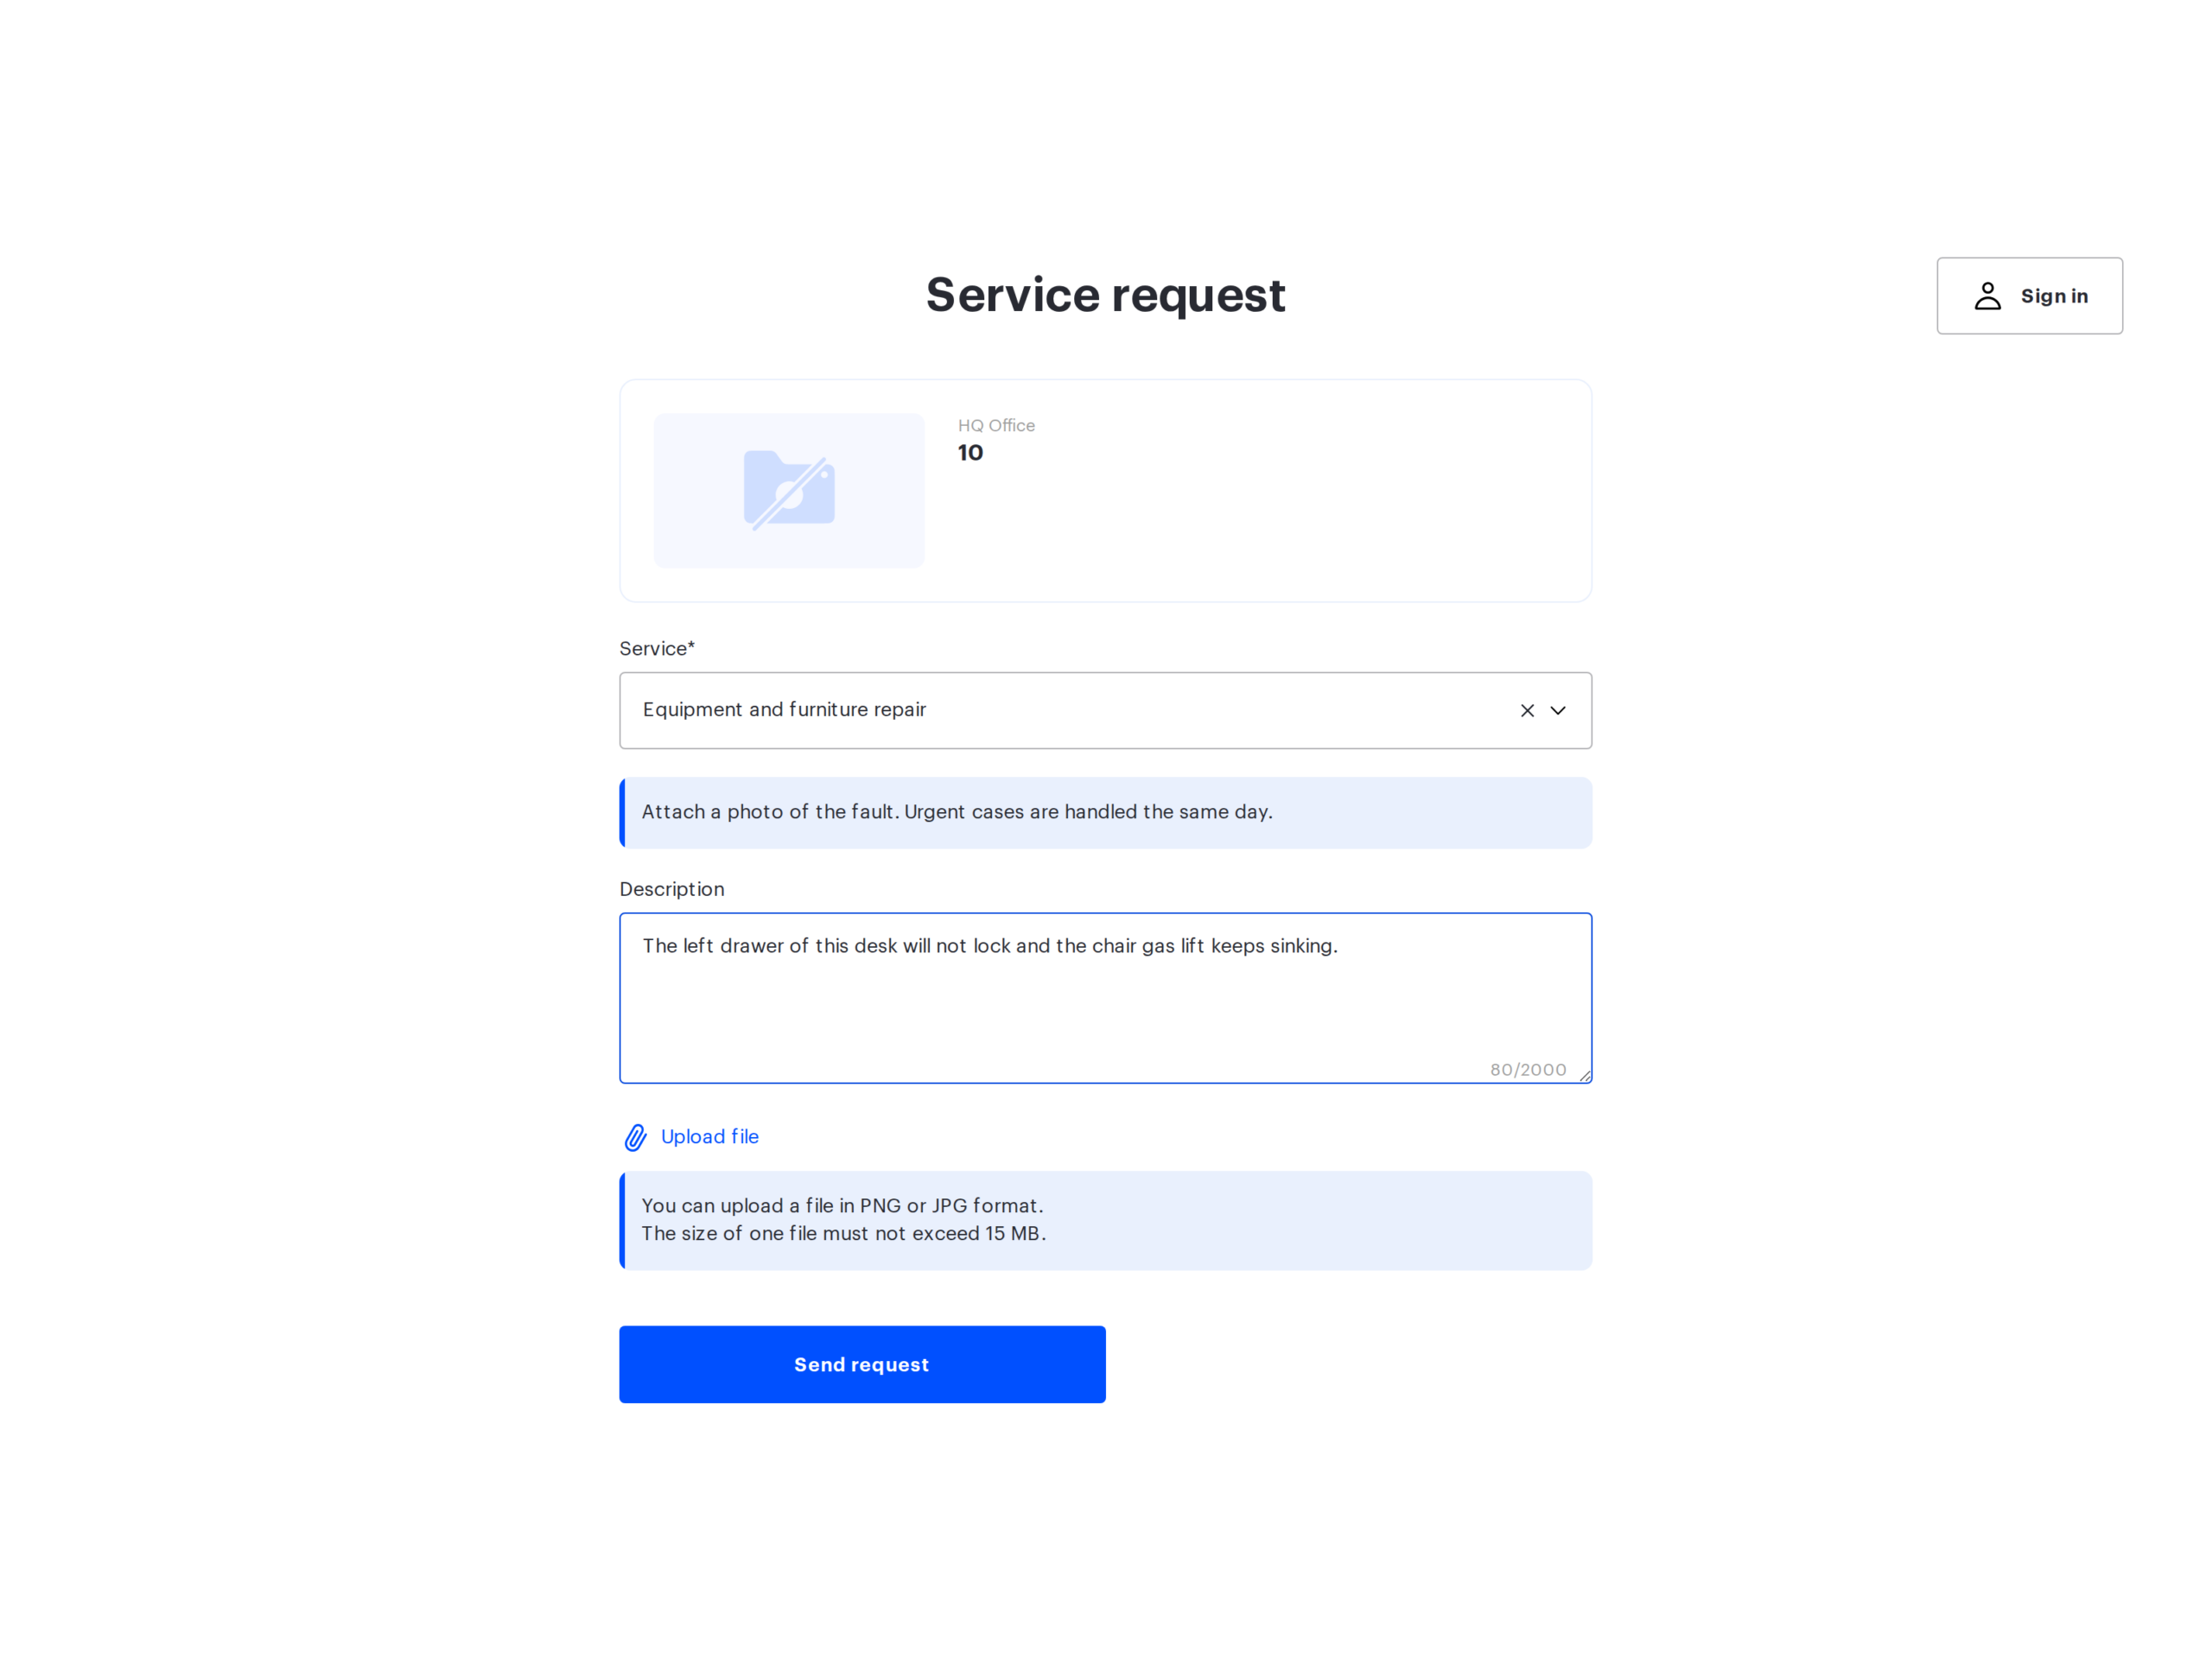
This form has two properties worth knowing before you print the first batch of codes.
| Property | What it looks like | How to work with it |
|---|---|---|
| The service list shows all public services of the company | The selection is by service mode and status, not by office or object: a service is not tied to an office at all. Scanning a desk code in one office, a person also sees the public services of another | Keep the number of public services small and give them names that make sense outside the office context. If a service is only needed in one office, leave it private |
| The request is anonymous | The form asks for no name, no phone and no email. In the console the initiator of such a request is shown as “No user data available” | Ask people to describe the problem in detail: there will be no way back to the requester. It is worth using the “Service description” to ask them to leave a contact in the request text if one is needed |
The requester gets neither a request number nor a link to it: they will not be able to check the status later without signing in. The public page has a “Sign in” button — an employee of the company can authenticate and submit the same request under their own name, and then it appears for them on the “Service requests” page.
Things to keep in mind
| Detail | How to work with it |
|---|---|
| The service type and the processing method cannot be changed after saving; the service mode can | Wrong mode — just switch it; wrong type — the service has to be created again |
| A QR export with no offices selected silently returns an empty list | Always select the offices before clicking “Generate report” |
| The “Download” button does nothing while no row is ticked in the table | Tick the resources you need or select them all — this is a separate step after generating the report |
| Switching a service from public to private does not disable printed codes | The link keeps working, but the service disappears from the list on the public page. If no public services are left, there will be nothing to choose |
| The “Request” button is in the object information card even when no “In the office” service exists | The employee will open a form with an empty service list. Create at least one service before telling the team about this route |
| A request can be submitted for an object that is later deleted | UnSpot moves the still-open requests of that object — those in the “New” and “Accepted” statuses — to “Cancelled” and adds a system comment. Requests that are already closed are left alone |
Related articles
- Service requests: overview — which service types exist and which to choose
- “For employee” requests: setup — setting up “For employee” requests
- “In meeting room” requests: setup — setting up “In meeting room” requests
- Processing requests in an external ticket system — processing requests in an external ticket system
- Processing service requests — how requests are processed inside UnSpot
- Request for an office object and by QR code — how to submit a request for an object and by QR code