Locker management
Lockers are storage cabinets with cells where employees keep their personal belongings. An administrator creates a locker, links it to an office space, uploads an image of the cabinet and marks the cells on it; employees book cells on the Lockers page and keep them until the booking is released manually. Lockers are managed from Administration → Office management → Workspaces: they appear in the space tree next to desks and meeting rooms.
Creating a locker and access to it
On the Workspaces page click “Add” and choose “Locker”. The form has three settings:
- “Name” — up to 64 characters; unique within the selected parent space (lockers without a parent are checked against each other);
- “Parent space” — a floor, building or city from the space tree; archived spaces cannot be selected. A locker can also be created without a parent and linked later;
- “Available for bookings for” — a toggle with three options: “No one” / “Selected Groups” / “All users”.
The access toggle controls who sees the cabinet on the Lockers page: “All users” — every active employee, “Selected Groups” — only members of the chosen user groups (groups marked as default are pre-selected automatically), “No one” — the cabinet is hidden from employees and visible only to administrators. The last option is handy while the cabinet is still being prepared.
Keep in mind. The locker-level setting controls only the visibility of the cabinet. The right to take a specific cell is configured separately — by the access groups of the cell itself (see the next section).
Locker map and cells
Cells are laid out in the locker map editor, which opens with the “Change map” button in the locker row. The main editor actions:
- “Add map” / “Update map” — upload an image of the cabinet: png or jpg, up to 5 MB. Cells cannot be placed until an image is uploaded;
- “Add a cell” — opens the cell form; placed cells can be moved, rotated and duplicated (one by one or in groups), and hovering over a cell shows the “Edit”, “Duplicate” and “Remove” actions;
- “Remove all” — deletes every cell together with the uploaded map image;
- “Save” — all editor changes are applied in one operation; before saving they can be discarded with “Cancel”. The list of keyboard shortcuts is available under the “Hotkeys” icon on the map panel.
The cell form:
- “Locker cell name” — 1 to 60 characters, unique within the locker (case-insensitive);
- “Cell type” — “Available to all” (the cell can be booked) or “Unavailable for booking” (the cell is shown on the map but cannot be booked — for example, while its lock is being repaired);
- “Access groups” — the user groups whose members may take the cell; the default group is pre-selected when the cell is created. A cell without access groups can be taken only by an administrator;
- “Connection to Pocket Lock cell” — appears when the smart-lock integration is connected (see the section below).
Keep in mind. If an occupied cell is switched to “Unavailable for booking”, its current booking is removed when you save — the editor asks for a separate confirmation first.
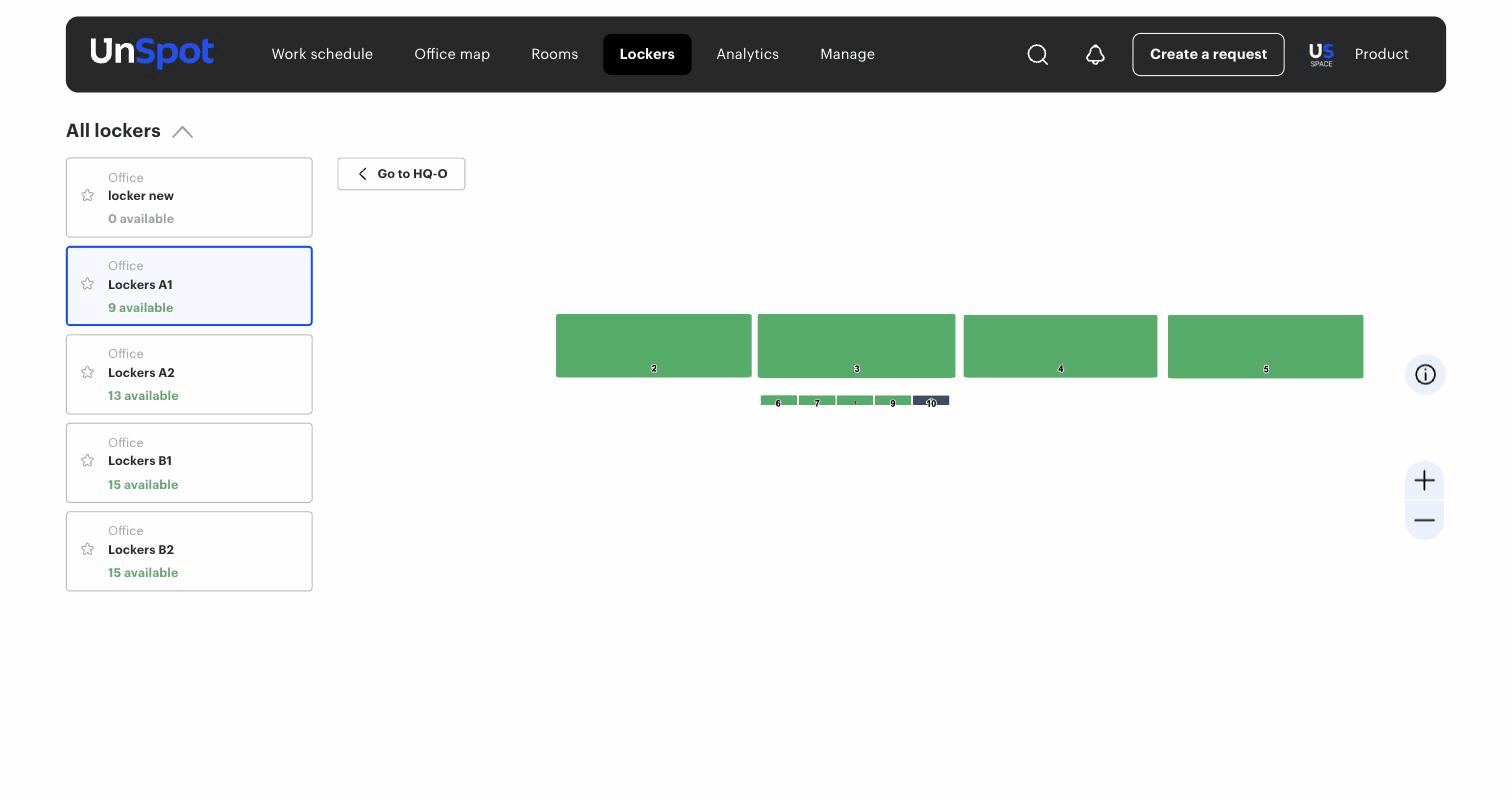
How cell booking works
Employees work with cabinets on the Lockers page in the side menu. On the left is the list of cabinets: “Pinned lockers” (marked with a star, reordered by dragging) and “All lockers”; each cabinet shows a counter of free cells. On the right is the map of the selected cabinet with cell statuses: available, taken, taken by me, not available (the legend is under the hint icon). The “Go to …” button above the map opens the floor plan of the parent space.
- a cell booking is open-ended: it has no end date, and the cell stays with the employee from the moment of booking until it is released;
- one cell — one employee; any employee with access to the cell can take it, and an administrator can take any free cell;
- a cell can be released by its owner or by an administrator. If the booking was removed by an administrator (or the cell was disabled or deleted), the employee is notified through the channels selected in the “Actions with my bookings” notification setting: email, push, Slack.
Pocket Lock integration (smart locks)
UnSpot integrates with the Pocket Lock smart-lock system: physical cells of the controller are linked to locker cells, and employees open the lock right from the UnSpot interface.
- the integration is connected in Administration → Integrations (available to the Super administrator and Integrations administrator roles);
- once connected, the cell form shows the “Connection to Pocket Lock cell” field — pick a free physical cell of the controller. One physical cell can be linked to only one UnSpot cell;
- a linked cell gets the “Open locker” action in its tooltip — it is available to the owner of the current booking and to administrators; an administrator can open or close any cell;
- when the physical cell is changed or unlinked, the stored lock state is reset and UnSpot re-synchronizes cell statuses with the controller.
Keep in mind. While the integration is not connected, the cell form shows a hint with a link to the Integrations page instead of the selection field.
Editing and deleting
- “Edit” in the locker row — rename the cabinet, change its parent space and access settings; the name is re-checked for uniqueness within the space;
- “Remove” in the locker row deletes the cabinet together with all its cells and active bookings — employees holding bookings are notified. Deletion cannot be undone;
- a space that still contains lockers cannot be deleted — delete or move its lockers first.
How lockers relate to other settings
| What | How it relates to lockers |
|---|---|
| User groups | Control the visibility of the cabinet (“Available for bookings for”) and the right to take each cell (“Access groups”) |
| Office map | A locker is placed on the floor plan via “Add elements” → “Locker” (picked from the lockers of the space); it can be hidden from the plan without deleting the cabinet itself |
| Reports | The locker log in the Reports section: who took or released a cell and when (BOOKED/RELEASED), how long the cell was held, and the action source (Desktop/Mobile) |
| Analytics | Cell occupancy is included in office workload analytics — on the lockers tab |
| Notifications | Removing a booking as an administrator, disabling or deleting a cell notifies the booking owner through the “Actions with my bookings” channels |
| Deleting spaces | A space with lockers cannot be deleted — delete or move the lockers first |
