
Map editor: placing objects
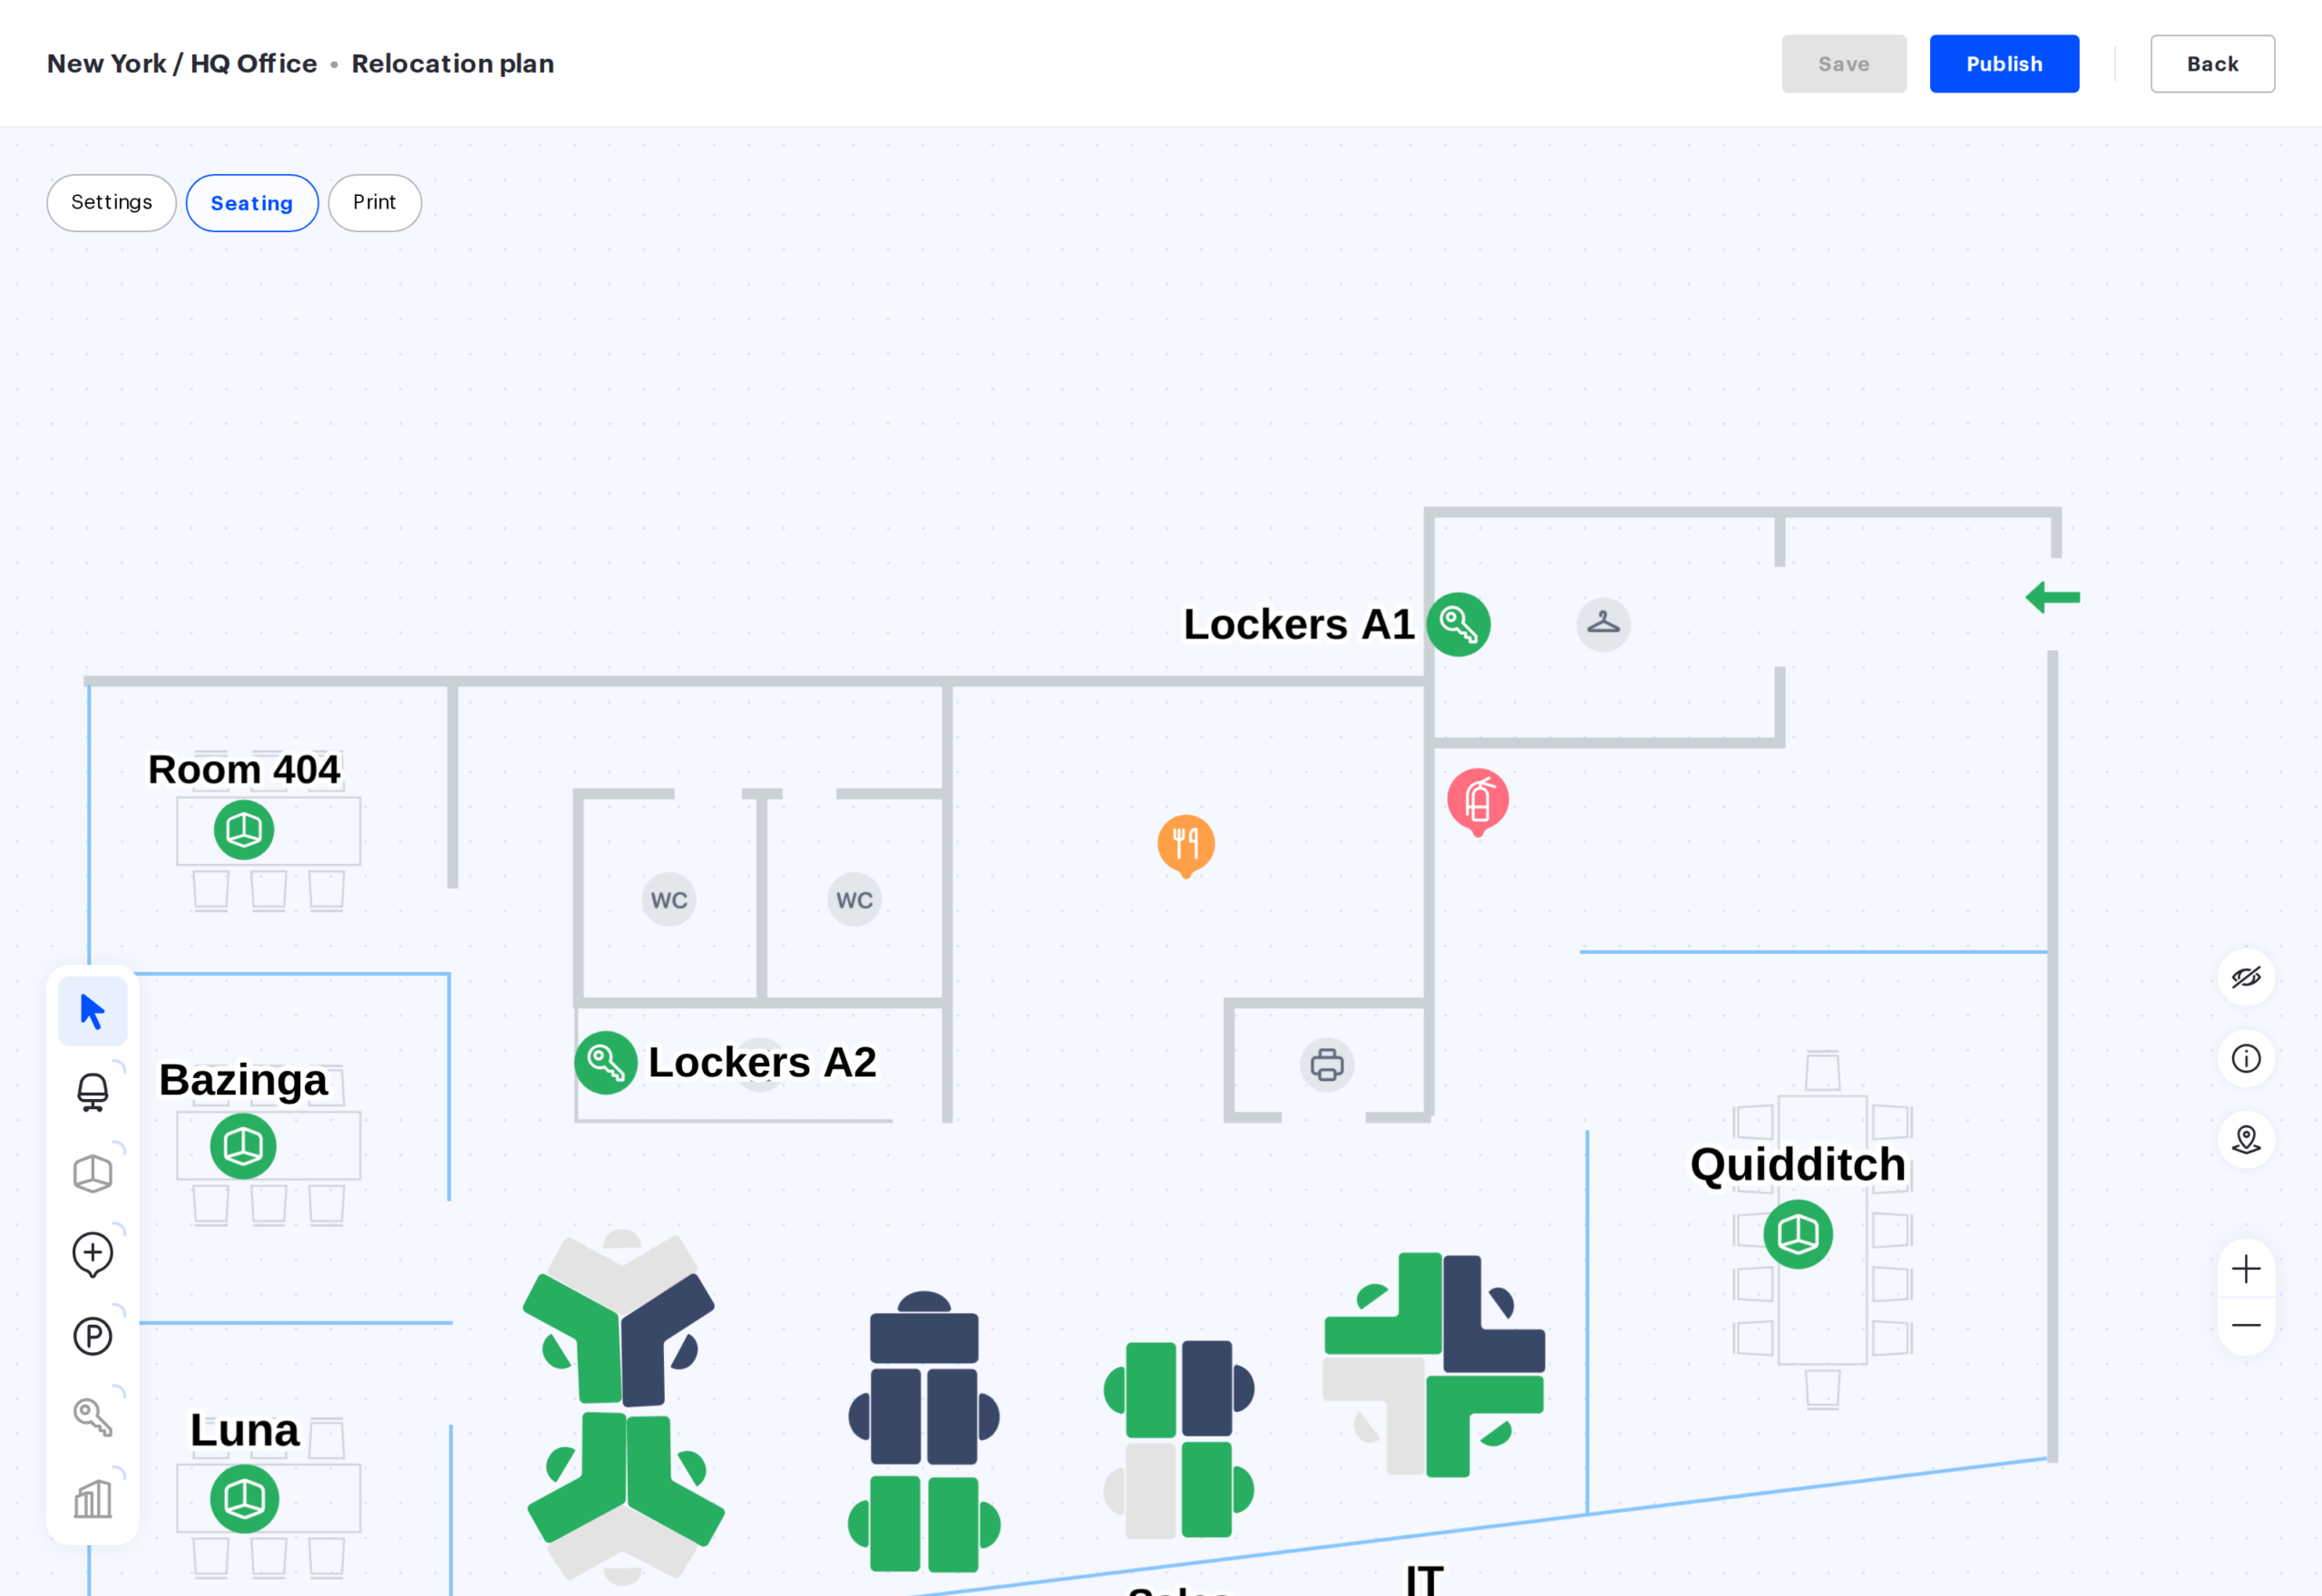
Seating is the mode of the map editor where objects appear on the floor plan and are moved, rotated, resized and deleted. Configuring the desks that are already placed — type of use, assignments, amenities, department — lives in a separate mode and is covered in “Map editor: configuring placed objects”.
Who needs this mode
Placing objects is a rare job: you do it when an office is first set up in UnSpot, when the layout changes, when desks are added or a department moves. It is usually one session of a few hours, after which nobody touches the plan for months. That is why placement and configuration are split into two modes and two articles — desk parameters are edited far more often than the desks themselves are moved.
The three editor modes
The mode switches sit at the top of the editor. A mode defines only the set of available tools, not a separate state of the map.
| Mode | What you can do | What you cannot do |
|---|---|---|
| Settings | Select an object and change its parameters | Move, rotate, resize, add or delete objects |
| Seating | Add, move, rotate, resize and delete objects; upload and replace the floor plan; change object settings | — |
| Prepare the plan for print: colours, labels, legend | Change the map |

Which mode opens depends on the state of the map: if there is no floor plan yet, Seating opens, so that you can upload the background right away. If the map already exists, the editor opens in Settings and you have to switch to Seating manually.
One map state for all modes
All three modes show the same map. A change made in Seating is immediately visible in the others: move a desk and it is already in its new place in Settings and in Print. Switching modes requires no intermediate saving and no page reload.
Which objects you can add
| Object | How it gets onto the map |
|---|---|
| Desk | Created right in the editor |
| Parking space | Created right in the editor |
| Points of interest (POI) | Created right in the editor, including description and image |
| Meeting room | Placement of an existing meeting room only |
| Locker | Placement of an existing locker only |
| Office | Placement of an existing nested workspace only |
Meeting rooms, lockers and nested workspaces are created in their own administration sections; the editor only places them on the plan. If every object of that type has already been placed, the add icon becomes disabled and the tooltip says “No meeting rooms available”, “No lockers available” or “No offices available”.
The first tool in the panel is the selection cursor, active by default. If you picked a shape and it is stuck to the cursor, Esc drops it and brings the cursor back.
Names of new objects
The name of a new object is filled in automatically and numbered in order: desks become “Desk 1”, “Desk 2” and so on, parking spaces become “Parking 1”, “Parking 2”. For points of interest the name comes from the shape catalogue and is numbered too. The language of these names follows the company language, not the interface language of the individual administrator. Any name can be changed in the object parameters — that is the Settings mode.
Desk pods
A pod is not added with a tool. Select two or more desks that do not belong to any pod and press cmd/ctrl + G, or use the grouping control above the selection. Desks can also be added to an existing pod — select it together with the desks you need.
A pod is ungrouped with the ungroup control above the selection; the confirmation asks “Do you really want to ungroup the selected zone?” and the buttons read “Yes, ungroup” and “No, cancel”. When a pod is selected, the ordinary delete control is not shown — a pod is ungrouped, not deleted. Details are in “Desk pods”.
Moving, rotating and resizing
- an object is dragged with the mouse; the arrow keys move it by one canvas pixel per press. For a meeting room, a locker, a nested workspace and a pod the label is a separate object: it can be dragged, rotated and resized independently of the shape; the names of desks and parking spaces do not move that way — they always follow the place;
- cmd/ctrl + ↑ and cmd/ctrl + ↓ scale it by one tenth of the object’s original size per press — the step is the same whatever the current scale; R + ↑ and R + ↓ rotate it by 1°;
- a desk, a parking space, a pod and a point of interest can be copied (cmd/ctrl + D, cmd/ctrl + C / V) — the copy gets its own name with the next number and the settings of the original, with two exceptions: a desk’s “By weekday” assignment is not carried over (the copy becomes a bookable “On any days” desk), and a point of interest loses its photo; lockers and nested workspaces are not copied: each such object is on the map once;
- a meeting room is copied with the same shortcuts and, when the selected objects are all of one type, with the duplicate icon above the selection as well (with a mixed selection there is no icon, only the shortcuts work). The copy does not create a new room: the first free meeting room of the office — from the same list the room selection window offers — is placed right away, without a selection window; it is not on the map yet and is not disabled. It takes the shape, size, rotation and label style of the original and keeps its own name and settings; to put another room in its place, use replacement — the pencil button above the selection. If there are not enough free meeting rooms, the extra copies are simply skipped, and the “Meeting room” window with the text “All available meeting rooms have already been added to the map” appears only when nothing at all was copied;
- cmd/ctrl + Z undoes the latest layout changes — moving, rotating and resizing, up to five steps back; object settings (shape, type, assignments) are not undone, and the undo history is cleared after Save and after publishing;
- Backspace or Delete deletes a desk or a parking space; for a pod the same key means ungrouping — the desks stay on the map. For meeting rooms, lockers, nested workspaces and points of interest the confirmation says hide rather than remove. For the first three that is literally true: the object is taken off the map but kept in its own settings section and can be placed again. A point of interest has no such section — the only way to bring a marker back is to create it anew.
All of the above is available in Seating only. In Settings objects are locked in place, so you cannot nudge a desk with the mouse while configuring it.
The floor plan: upload and replace
The map background is uploaded and replaced in Seating — the Add floor plan button on an empty draft, and the Change the floor plan action once a plan exists. Format png or jpg, up to 5 MB. Until the floor plan is uploaded, Save and Publish stay disabled. File requirements are covered in “The floor plan: upload, replace and delete the map”.
Replacing the plan is the only action in the editor that applies immediately, bypassing Save and Publish changes: the file goes to the server the moment you pick it, and Back does not roll it back. On the published map the new file becomes the workspace plan at once and the previous one is deleted; inside a draft the new plan is stored with the draft and reaches the map when the draft is published. If in doubt, change the plan in a draft or keep a copy of the previous file.
Hotkeys
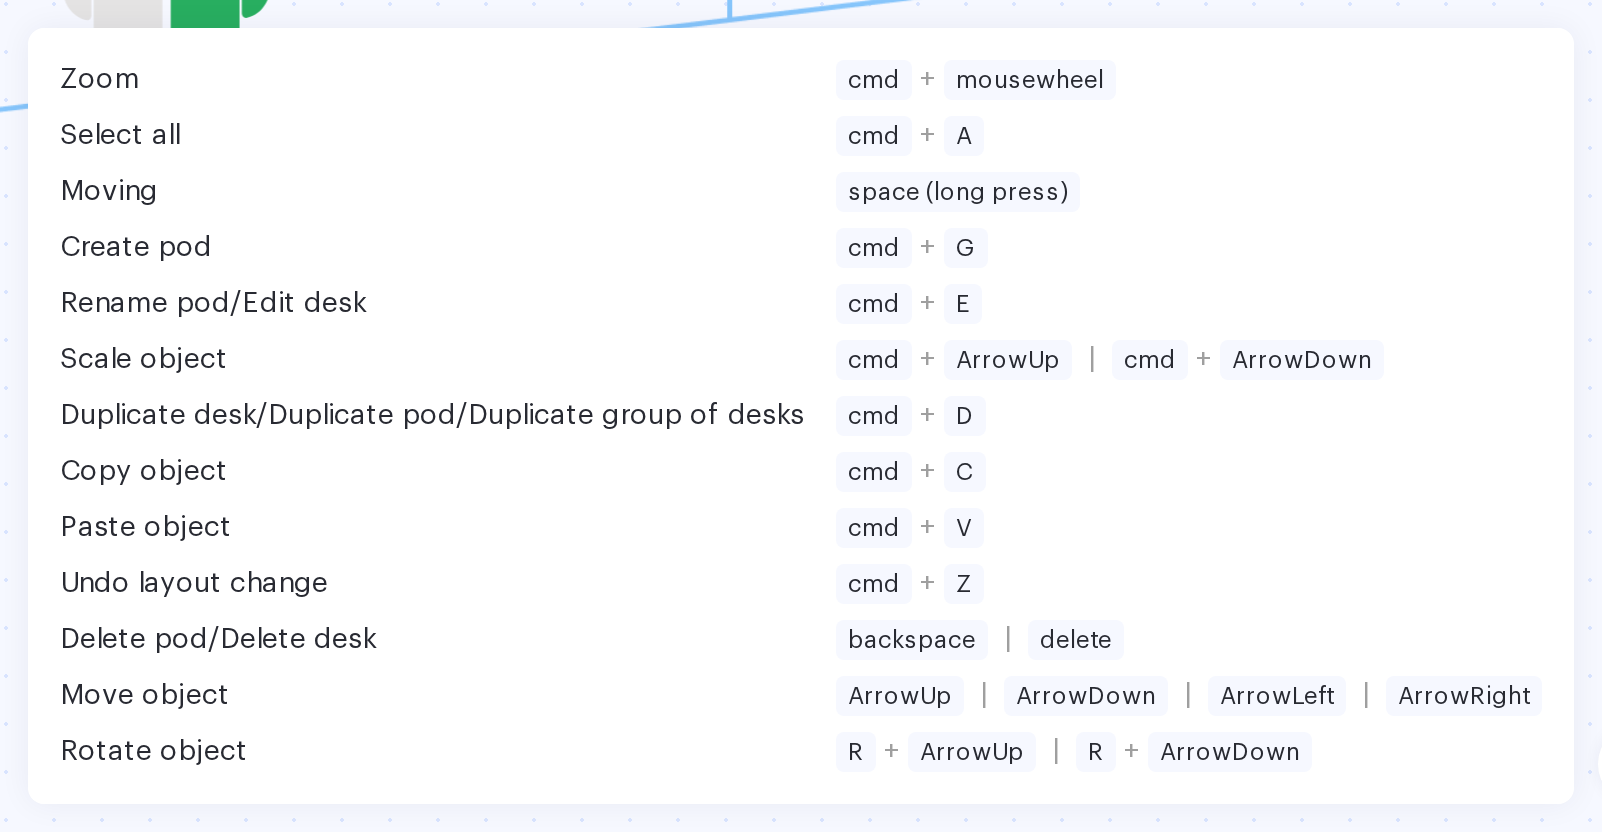
The keyboard button in the panel on the right opens the list of shortcuts. There are thirteen of them: Seating has all of them, Settings has four (the other nine are about moving, adding and deleting objects), and in Print the panel is not shown at all. In the shortcuts below cmd is for macOS; on Windows and Linux use ctrl instead.
| Action | Shortcut | Works in Settings |
|---|---|---|
| Zoom | cmd + mouse wheel | yes |
| Select all | cmd + A | yes |
| Moving | long press on the space bar | yes |
| Rename pod/Edit desk | cmd + E | yes |
| Create pod | cmd + G | no |
| Duplicate desk/pod/group of desks | cmd + D | no |
| Copy object | cmd + C | no |
| Paste object | cmd + V | no |
| Undo layout change | cmd + Z | no |
| Scale object | cmd + ↑ and cmd + ↓ | no |
| Move object | the arrow keys | no |
| Rotate object | R + ↑ and R + ↓ | no |
| Delete pod/Delete desk | Backspace or Delete | no |
The action names in the table follow the interface, in shortened form. In fact cmd + D duplicates not only a desk, a pod and a group of desks, but also a parking space, a point of interest and a meeting room — how this works is described above.
The panel on the right
The vertical panel at the right edge of the editor does not depend on the selected object — it collects the actions that apply to the whole map:
| Button | What it does |
|---|---|
| “Display desks and parking spaces numbers” / “Hide desks and parking spaces numbers” | turns the place labels on and off inside the editor; printing is not affected — it has its own switches |
| Information | opens the “Legend”: which colours mark bookable, assigned and unavailable places |
| “Change the floor plan” | uploads a new map background; the button is disabled in Settings and Print |
| “Zoom in” and “Zoom out” | the map scale; cmd + mouse wheel does the same |
| “Hotkeys” | the shortcuts available in the current mode |
Lockers and nested workspaces
Like meeting rooms, these two objects cannot be created in the editor — only placed once they exist. Unlike a meeting room, a locker and a nested workspace cannot be copied.
- a locker is created in “Manage → Office management → Lockers”, a nested workspace in “Workspaces” as a child of the floor; only nested workspaces with their own uploaded floor plan appear in the placement list — a workspace without a plan cannot be placed;
- placement takes two steps: the tool puts an icon on the plan, and right after that a window opens where you choose which locker or which workspace stands behind it; Cancel in that window removes the icon you have just placed. Meeting rooms are placed the same way with the Meeting room tool — a copy of a meeting room, by contrast, is placed without a selection window;
- if nothing is free, the tool is disabled and the tooltip says “No lockers available” or “No offices available”;
- the Delete key takes such an object off the map without deleting it: the confirmation asks “Are you sure you want to hide this Locker?” — the locker itself and its cells stay in the settings;
- an object taken off the map appears in the list of available ones again and can be placed anew;
- when a draft is published, the lockers and workspaces removed from it are taken off the map; if they were deleted from the system, publishing simply skips them.
What the employee sees and how lockers themselves work is covered in “Locker management”.
Leaving the editor and saving
| Action | What happens |
|---|---|
| Save (draft only) | Writes the changes into the draft and keeps you in the editor. Employees do not see them yet and no emails are sent |
| Back | Exits to the Drafts page. If there are unsaved changes, the question “You have unsaved changes. Do you want to discard changes and leave?” appears — on exit they are lost |
| Publish changes (published version) | First the question “Notification to users” appears — “Yes, notify” or “No”. After you answer, the changes are saved into the working map and the editor closes |
| Publish (draft) | The draft is moved into the working map — with a confirmation and with the consequences described in a separate article |
What is different inside a draft
- changes are invisible to employees and do not affect bookings until you publish;
- meeting rooms, lockers and nested workspaces cannot be created in the editor — only placed; if none are free, the tool is disabled;
- meeting rooms, lockers and nested workspaces that were deleted from the product while the draft was sitting there disappear from it silently the next time it is opened.
What publishing does with the objects you placed is covered in “Publishing a seating draft”.
Related articles
- Map editor: configuring placed objects — the second mode: desk parameters and bulk editing;
- The floor plan: upload, replace and delete the map — the map background;
- Desks on the map — adding, configuring and deleting desks;
- Points of interest on the map — markers created straight in the editor;
- Seating drafts: overview — the published version and drafts;
- Printing the office map — the third mode of the editor.
- Office map editor: an overview of the actions — all the actions with the map.