Admin panel
The admin panel is the UnSpot section where the whole company workspace is configured: booking and check-in policies, offices and maps, employees and their permissions, and integrations with external systems. This article gives an overview of every console section and shows which role has access to which section.
The panel opens from the “Manage” item in the top menu. The item is visible only to users with administrative roles; the Super Administrator has full access to all sections (see User Roles).
What’s in the console
The Manage section contains four tabs: Company settings, Office management, People management, and Integrations. In addition, two separate top-menu items belong to the admin console: Analytics (reports and statistics) and Inbox (requests waiting for an administrator’s decision).
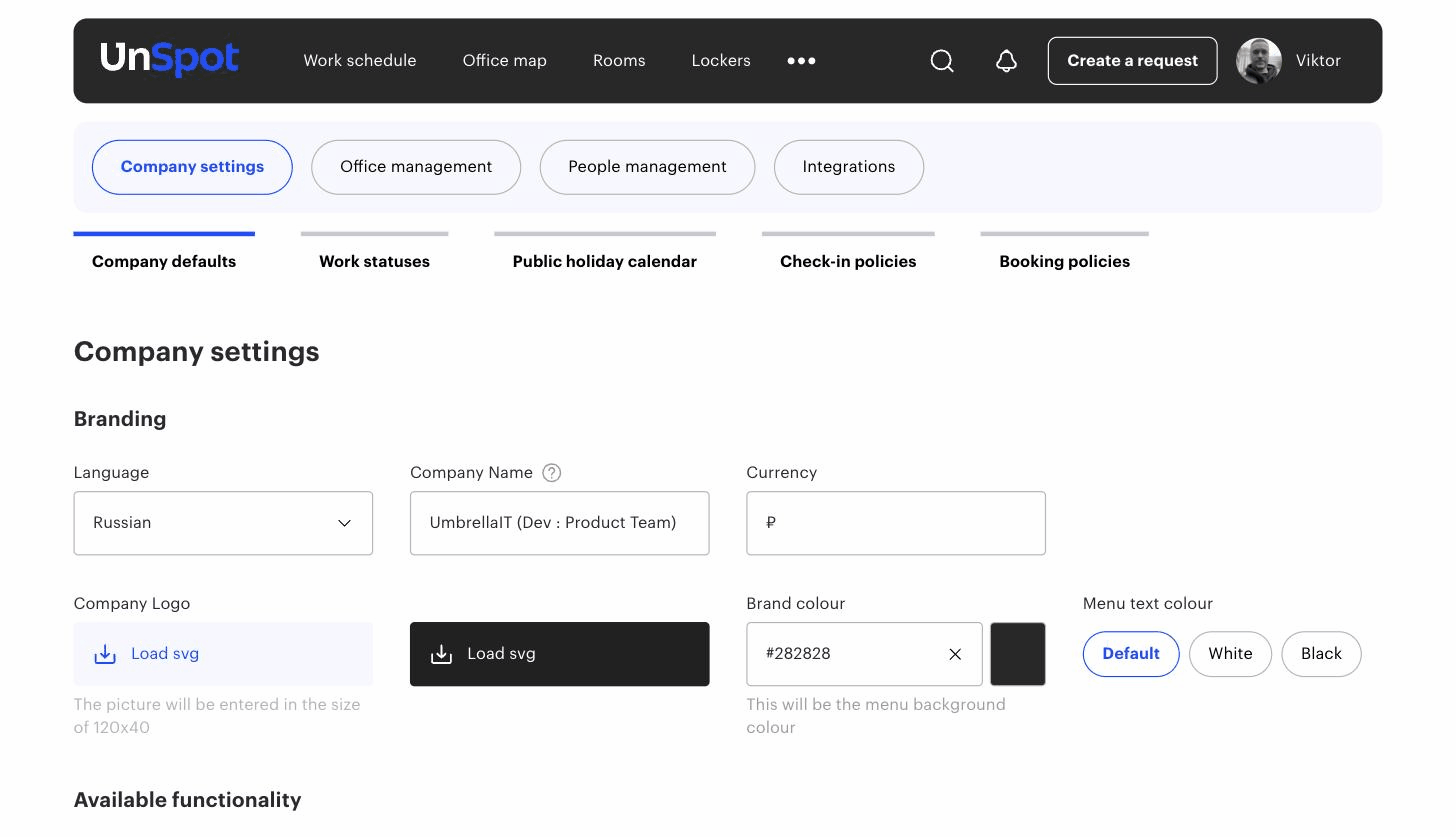
💡 The set of visible pages depends on the enabled modules (Offices, Meeting rooms, Work schedule, Lockers, Services, etc.) — modules are switched on in Company settings → Company defaults.
Company settings
| Subsection | What it configures |
|---|---|
| Company defaults | Company details, enabling and disabling system modules, the default home page for employees. |
| Work statuses | Employee statuses in the work schedule (shown when the Work schedule module is enabled). |
| Public holiday calendar | The company’s non-working days and public holidays. |
| Check-in policies | Check-in rules: when bookings must be confirmed and by which methods (WiFi/IP, GPS, QR, access control system, etc.). |
| Booking policies | Booking rules for desks, meeting rooms, and parking: horizons, limits, restrictions. |
Office management
| Subsection | What it configures |
|---|---|
| Workspaces | Office structure (cities, buildings, floors), floor plans, and map objects: desks, meeting rooms, parking, lockers — the “Edit map” action. |
| Amenities | The catalog of amenities that can be attached to desks and meeting rooms (monitors, whiteboards, etc.). |
| Resources report | Data exports for company resources, including QR codes for desks and meeting rooms. |
| Services | The catalog of meeting-room services (e.g. cleaning or coffee) and external ticket-system connections; shown when the Services module is enabled. |
People management
| Subsection | What it configures |
|---|---|
| Users | The employee list: adding manually or importing from CSV, the employee profile (role, schedule, permissions), logging in as a user, data export. |
| Groups & Teams | Resource access groups and teams; available to the Super Administrator only. |
| Organisational structure | The department tree, department managers, CSV import of the structure. |
Integrations
| Subsection | What it configures |
|---|---|
| Synchronisations | User synchronisation: Entra ID (Azure AD), AD LDAP, OpenLDAP, Google Workspace, SCIM 2.0, CSV; calendar synchronisation. |
| Login options / SSO | Password sign-in and two-factor authentication, SSO (Microsoft 365, Google, Apple, Yandex, SAML, OpenID Connect, OAuth 2.0), trusted domains. |
| Incoming webhooks | Receiving events from external systems, such as an access control system (JSON) — the “In office” status and automatic booking check-in. |
| Outgoing webhooks | Webhooks about UnSpot events to external systems (parking bookings, lost display connection, etc.). |
| Meeting room displays | Connecting tablets at meeting room doors (see Meeting room displays). |
| API Settings | External API tokens (booking history, user data, schedule import, monitoring) and access-control-system integrations. |
Analytics
The Analytics menu item contains seven tabs: Reports (20+ ready-made reports on bookings, attendance, resources, and logs), By employee, By office, By desks, On the map, Meeting Rooms, and Tariff (usage of tariff resources).
Inbox
The Inbox menu item collects requests waiting for a decision: Booking confirmation, Meeting room requests (booking approval by a coordinator), and Access requests (applications from self-registered users; available to the Super Administrator only).
Which role sees what
| Role | Available console sections |
|---|---|
| Super Administrator | All sections, including Groups & Teams and Access requests. |
| Office manager | Analytics; editing floor maps and existing office cards (opened from the Office map); booking past restrictive booking policies. |
| Offices Administrator | Company settings, Office management, Analytics. |
| Users Administrator | People management (without Groups & Teams), partial Analytics. |
| Integrations Administrator | Integrations, partial Analytics. |
For the full description of each role, see User Roles.
