
Desks on the map: adding, configuring and deleting
A desk is the main object of the office map — it is what employees book. This article covers the full life cycle of a desk on the map: adding, configuring, copying and deleting. What the types of use mean is covered separately in “Desk types”, and assignments in “Assigning a desk to an employee”.
How to add a desk
Desks are added in the map editor, in the Seating mode. The path: “Manage → Office management → Workspaces” → Change map → on the Drafts page open the published version or a draft.
- pick Desk in the object panel on the left;
- choose the shape of the desk and place the object where you need it on the plan;
- the name is filled in automatically — “Desk 1”, “Desk 2” and so on;
- click Save (in a draft) or Publish changes (in the published version).
A desk is created right in the editor — there is no need to register it anywhere in advance, unlike meeting rooms, lockers and nested workspaces, which the editor only places.
The desk card
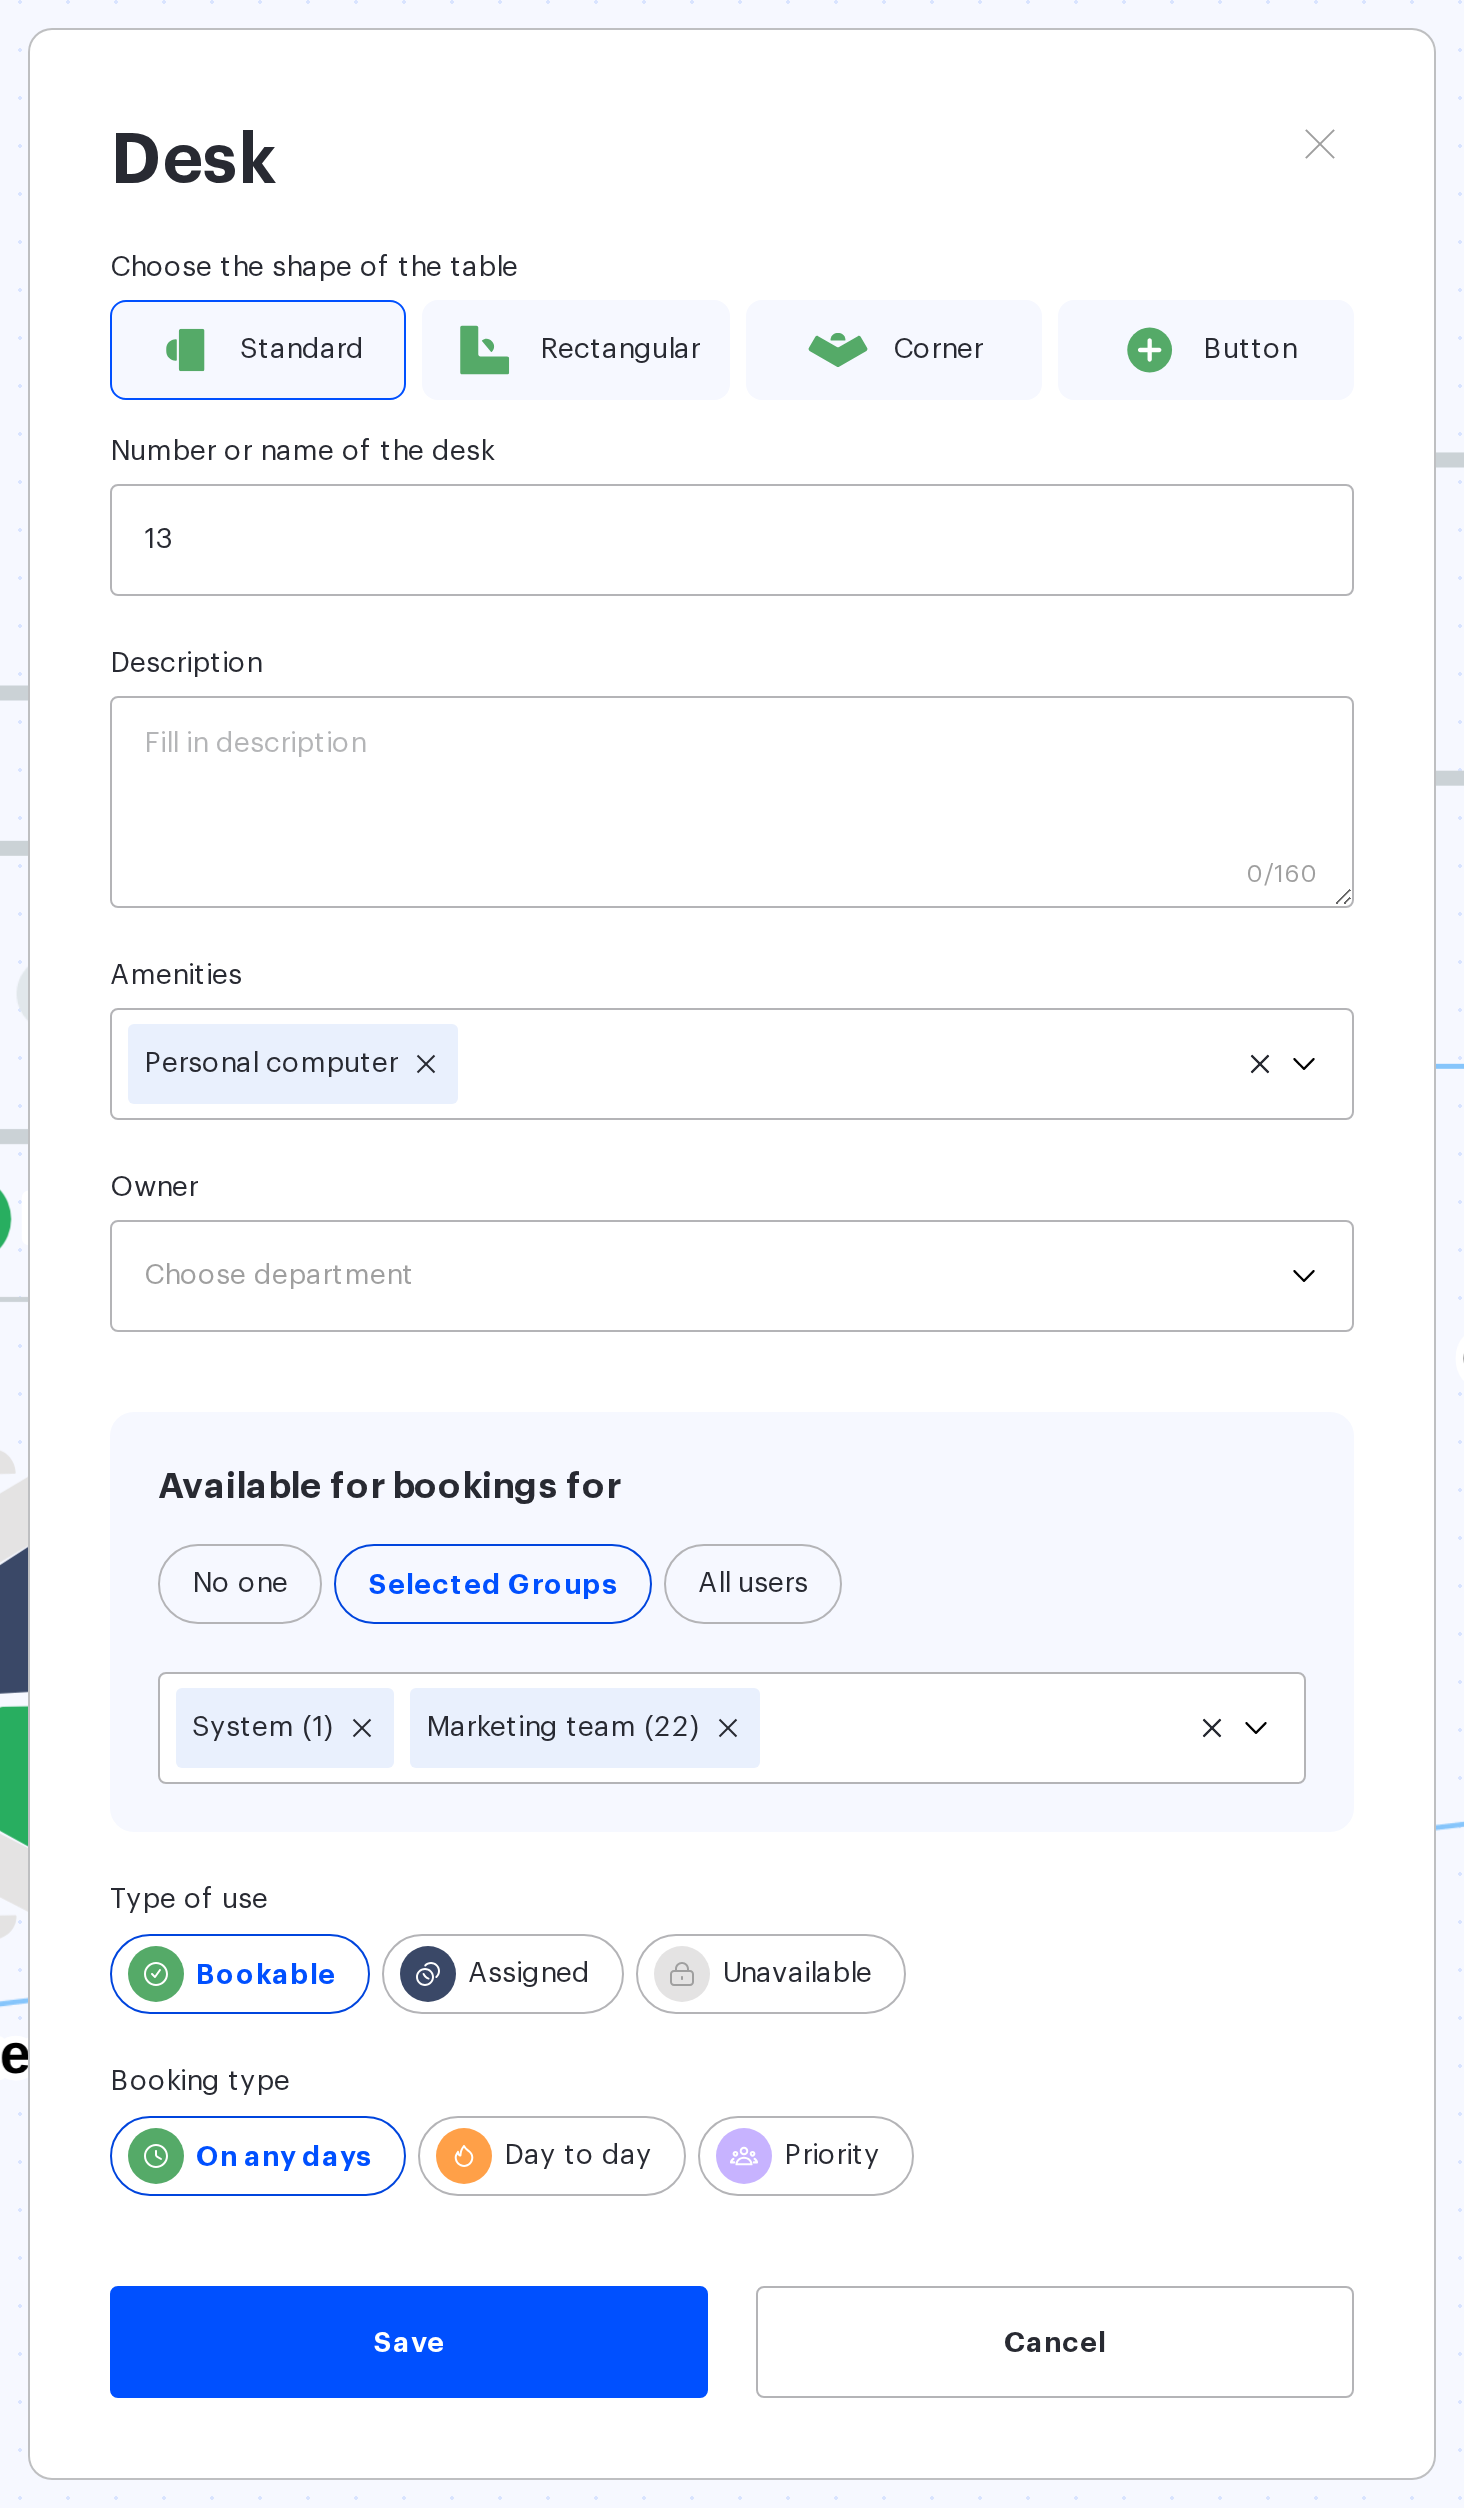
A double click on a desk opens its card — a modal window above the map; a single click only selects the desk. The set of fields is the same when the desk is created and when it is changed:
| Field | What it sets |
|---|---|
| Choose the shape of the table | Standard · Rectangular · Corner · Button — how the object looks on the map |
| Number or name of the desk | the name of the place, 1 to 60 characters; must be unique within the map, the check ignores letter case |
| Description | free text up to 160 characters, visible to the employee when booking |
| Owner | the department the desk belongs to |
| Amenities | monitor, docking station and so on from the amenities catalogue |
| Type of use | Bookable · Assigned · Unavailable |
| Booking type | depends on the type of use — see the next section |
| Available for bookings for | No one · Selected Groups · All users |
The card opened from the map editor has no photo field: the picture is uploaded in the desk card outside the editor, from the Seating page. File requirements: png, jpg or jpeg up to 5 MB.
Type of use and booking type
These are two levels and they are often confused: the type of use answers “how does this place live at all” (Bookable · Assigned · Unavailable), the booking type answers “how is it taken” (“On any days”, “Day to day” or “Priority” for Access Groups for a bookable desk; “By weekday”, “Priority” for several employees or “For period” for an assigned one). What each option means, what the former “Hot” and “Hoteled” became and what happens to bookings when the type changes is covered in “Desk types”.
Who can book the desk
The Available for bookings for switch has three positions: No one, Selected Groups (access groups are then chosen below) and All users. How this relates to access groups is covered in “Resource access rights”.
Copying a desk
A copy receives its own name with the next number and the settings of the original — with one exception: a “By weekday” assignment is not carried over, such a copy becomes a bookable “On any days” desk. Priority employees or groups, the booking type and access are copied as they are. Two ways:
- select the desk and press cmd/ctrl + D — the duplicate appears next to it with an offset;
- cmd/ctrl + C and cmd/ctrl + V — copy and paste the object.
Copying is available in the Seating mode only.
Moving, rotating and resizing
A desk is dragged with the mouse, the arrow keys move it one step at a time, cmd/ctrl + ↑ and ↓ scale it, R + ↑ and R + ↓ rotate it. All of this is the Seating mode; the details and the full hotkey list are in “Map editor: placing objects”.
Changing the settings
The parameters of a desk that is already placed are edited in the Settings mode: objects there are locked in position, so the desk cannot be nudged by accident. Click the desk, change the fields of the card and save. The shortcut cmd/ctrl + E opens the card of the selected desk.
What happens to bookings
- Switching to “Day to day”. Before the card is saved, the editor warns: “All the upcoming bookings of this desk will be removed if you change the desk type. Want to proceed?” — after “Yes”, all future bookings of the desk are removed. This is the only transition with such a warning: switching back from “Day to day” to “On any days” leaves the bookings alone;
- Switching to “Unavailable”. The “Change place status” window opens: “Release the place” removes the existing bookings, “Keep bookings” keeps them;
- Assigning the desk. A new or changed “By weekday” or “For period” assignment and a change in the list of “Priority” employees open the “Assign a place?” window: with “Strict assign” (or “Delete bookings” for the priority list) other people’s bookings for this desk are cancelled, with “Soft assign” (“Keep bookings”) they are kept — details in “Assigning a desk to an employee”;
- Notifications. The card does not ask “Notification to users” — the editor asks once when you click “Publish changes”: “Yes, notify” emails the employees whose desk settings changed, “No” saves silently.
When a draft is published, no emails are ever sent — see “Publishing a seating draft”.
Deleting a desk
- select the desk and press Backspace or Delete, or use the delete control above the selection;
- the confirmation asks “Are you sure you want to remove this Desk?”;
- for several desks the text is different — “Are you sure you want to remove selected Desks?”;
- save the changes with Save or Publish changes.
On the published map, all future bookings of the desk are removed together with it, and a booking that is in progress at that moment is stopped; inside a draft this happens when the draft is published. Employees receive emails about the cancelled bookings only if you choose “Yes, notify” at “Publish changes” — publishing a draft sends no emails. Once saved, a deleted desk cannot be restored, only created again.
Deleting is available in the Seating mode only. The whole map is deleted from the Drafts page instead — see “The floor plan: upload, replace and delete the map”.
Working with many desks at once
Select desks with a frame or press cmd/ctrl + A — the actions appear above the selection. At once you can apply one shape, one name, description, amenities, department, access groups and type of use, and delete the selected desks. A selected pod expands into its desks and the parameters apply to each. Details are in “Map editor: configuring placed objects”.
What is different inside a draft
- changes are invisible to employees and do not affect bookings until you publish;
- the For period assignment is not available in a draft — the other assignment types work;
- an employee’s availability is checked only against the assignments inside this same draft;
- if an employee, an access group, an amenity or a department was deleted while the draft was waiting, it is cleared from the card the next time the draft is opened.
Related articles
- Desk types — what each type of use means;
- Assigning a desk to an employee — assignments and reseating;
- Desk pods — grouping desks into a pod;
- Parking spaces on the map — the other object created straight in the editor;
- The floor plan: upload, replace and delete the map — the map background;
- Map editor: configuring placed objects — bulk editing;
- Map editor: placing objects — geometry and hotkeys.
- Office map editor: an overview of the actions — all the actions with the map.