
Access Groups: rules and configuration options
An Access Group ties a list of employees to a list of objects: until the employee and the resource end up in the same group, the employee gets no group access to the resource. This article explains the rules groups follow, how the “No one”, “Selected Groups” and “All users” options differ, how the built-in ALL USERS group works and how to build full or restricted access. The step-by-step configuration is in Configuring resource access rights; this article covers the rules and the choice of option.
What an Access Group is
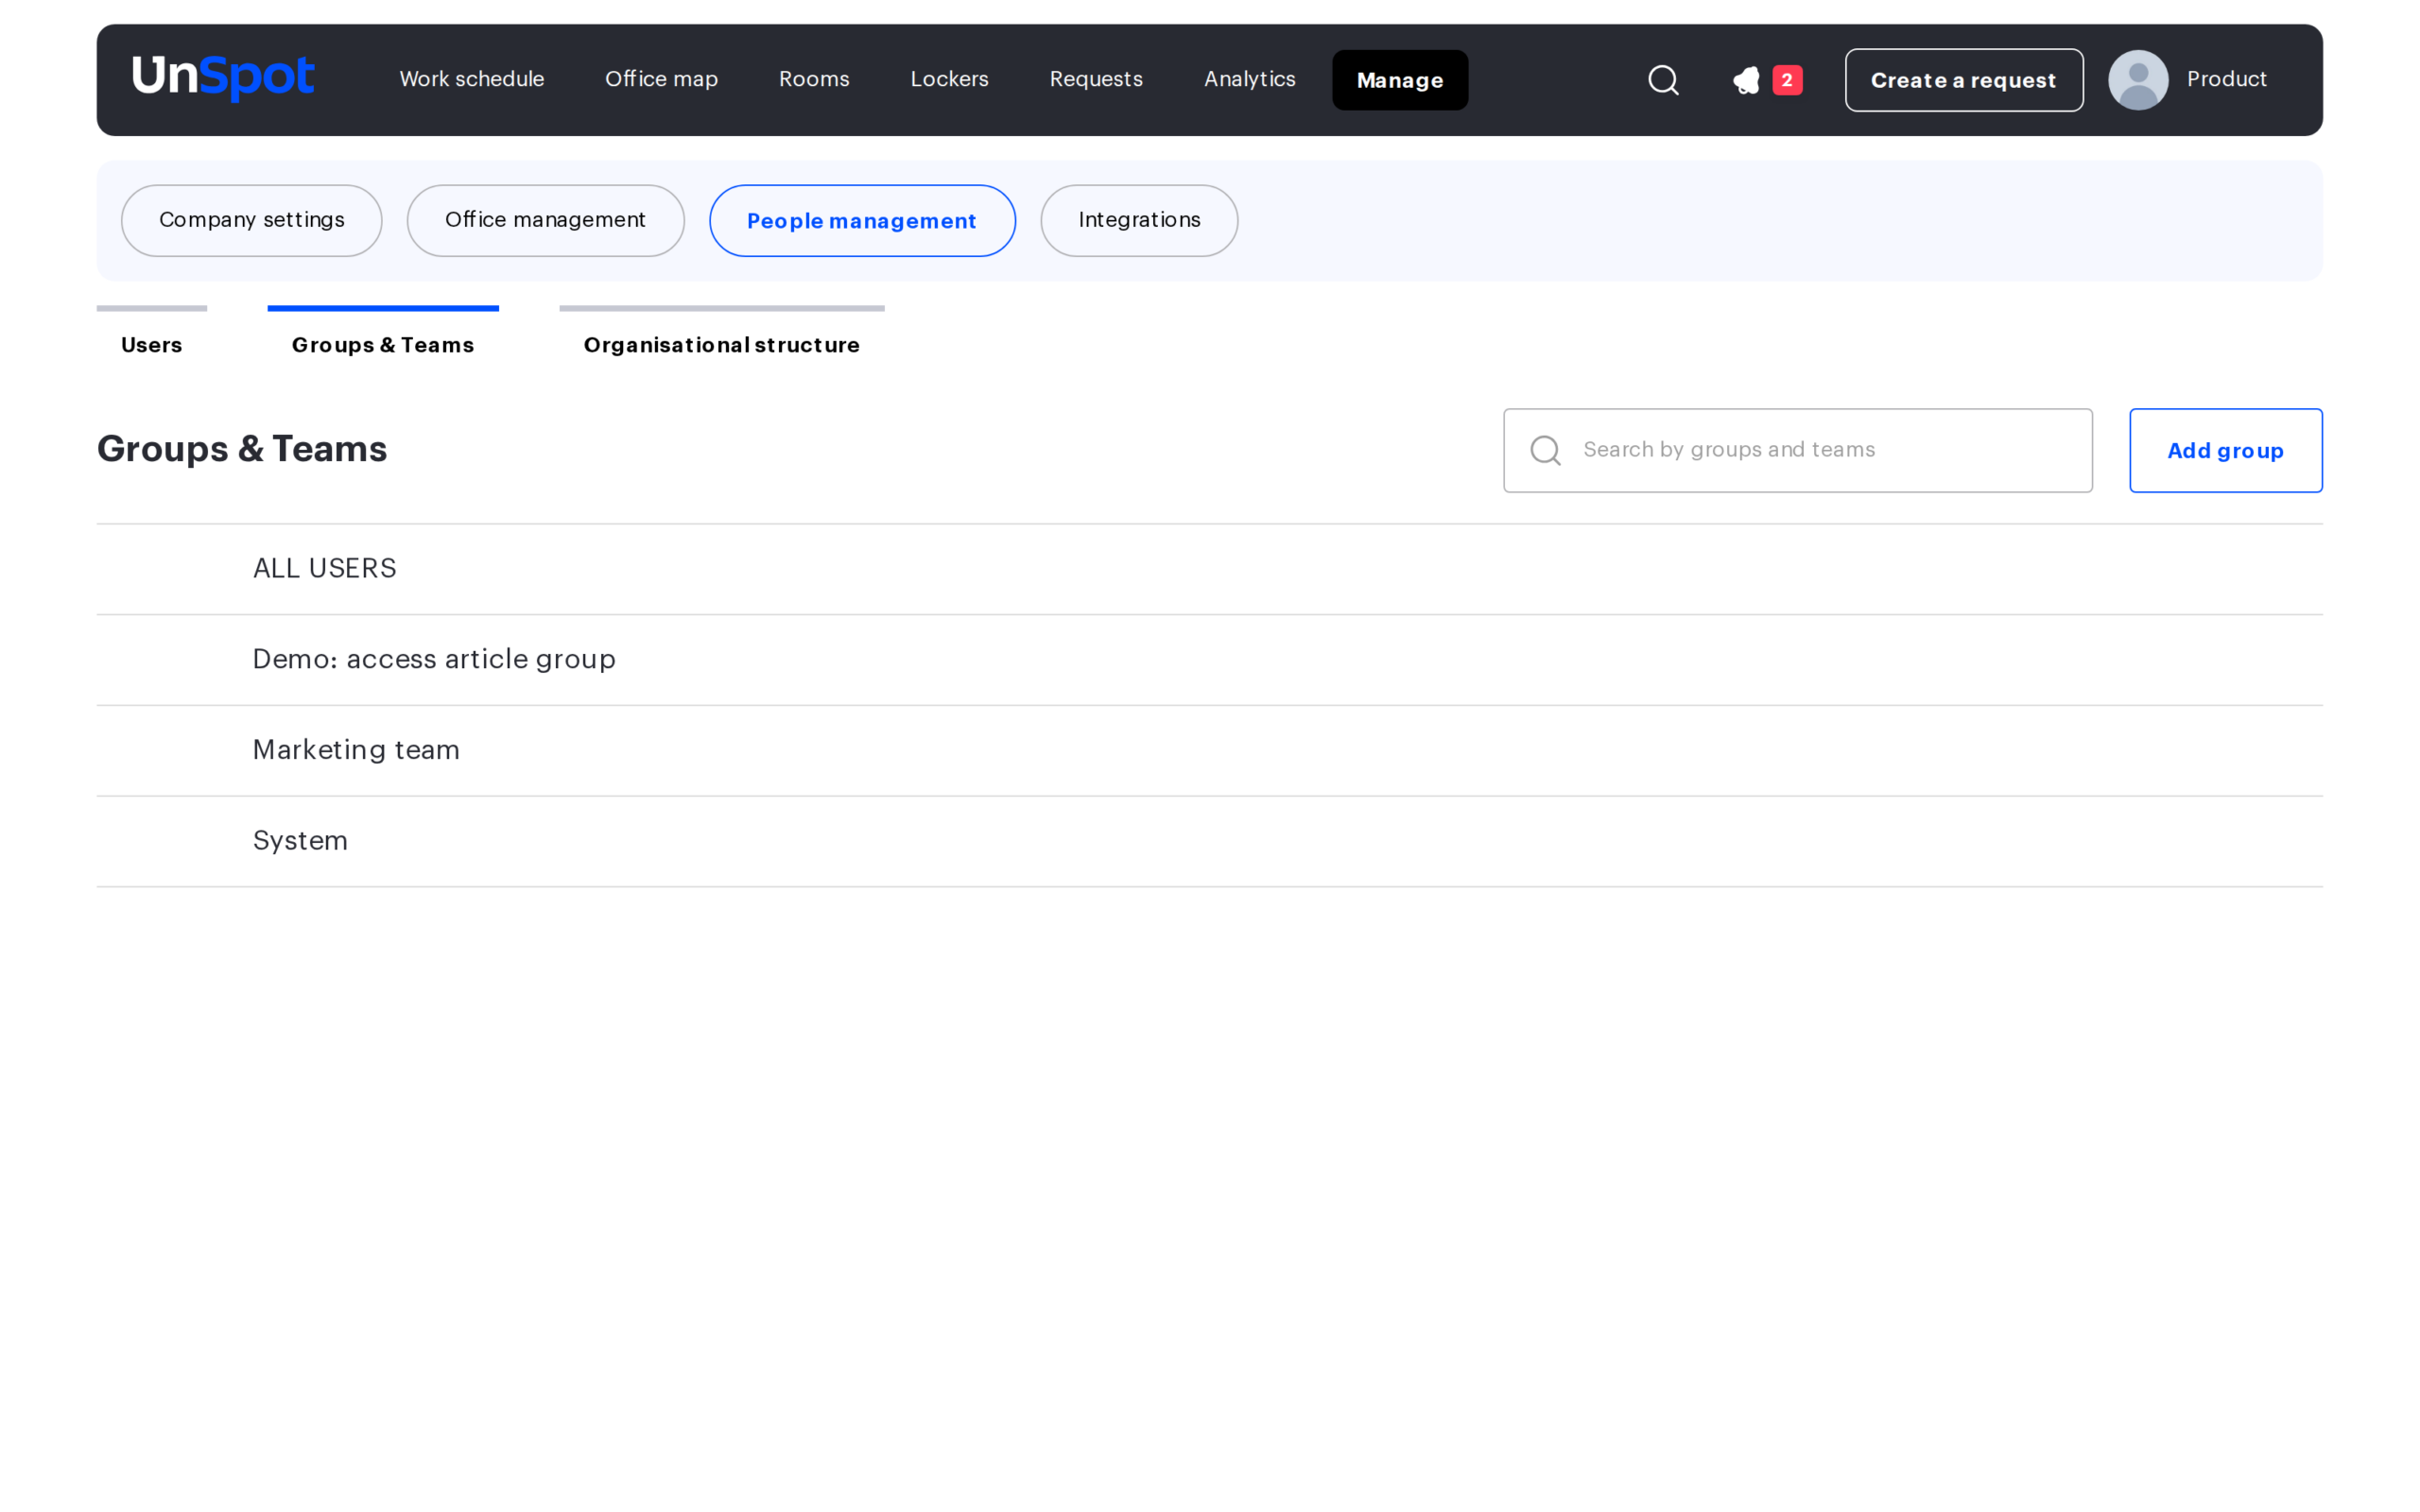
An Access Group is a named list of employees plus a list of objects they are allowed to book. Groups are managed in “Manage → People management → Groups & Teams”.
A single group may contain objects of different types:
- spaces — offices, buildings and floors;
- desks;
- meeting rooms;
- parking spaces;
- lockers and individual locker cells;
- meeting room displays.
Points of interest are not linked to Access Groups — they are visible to everyone who sees the map.
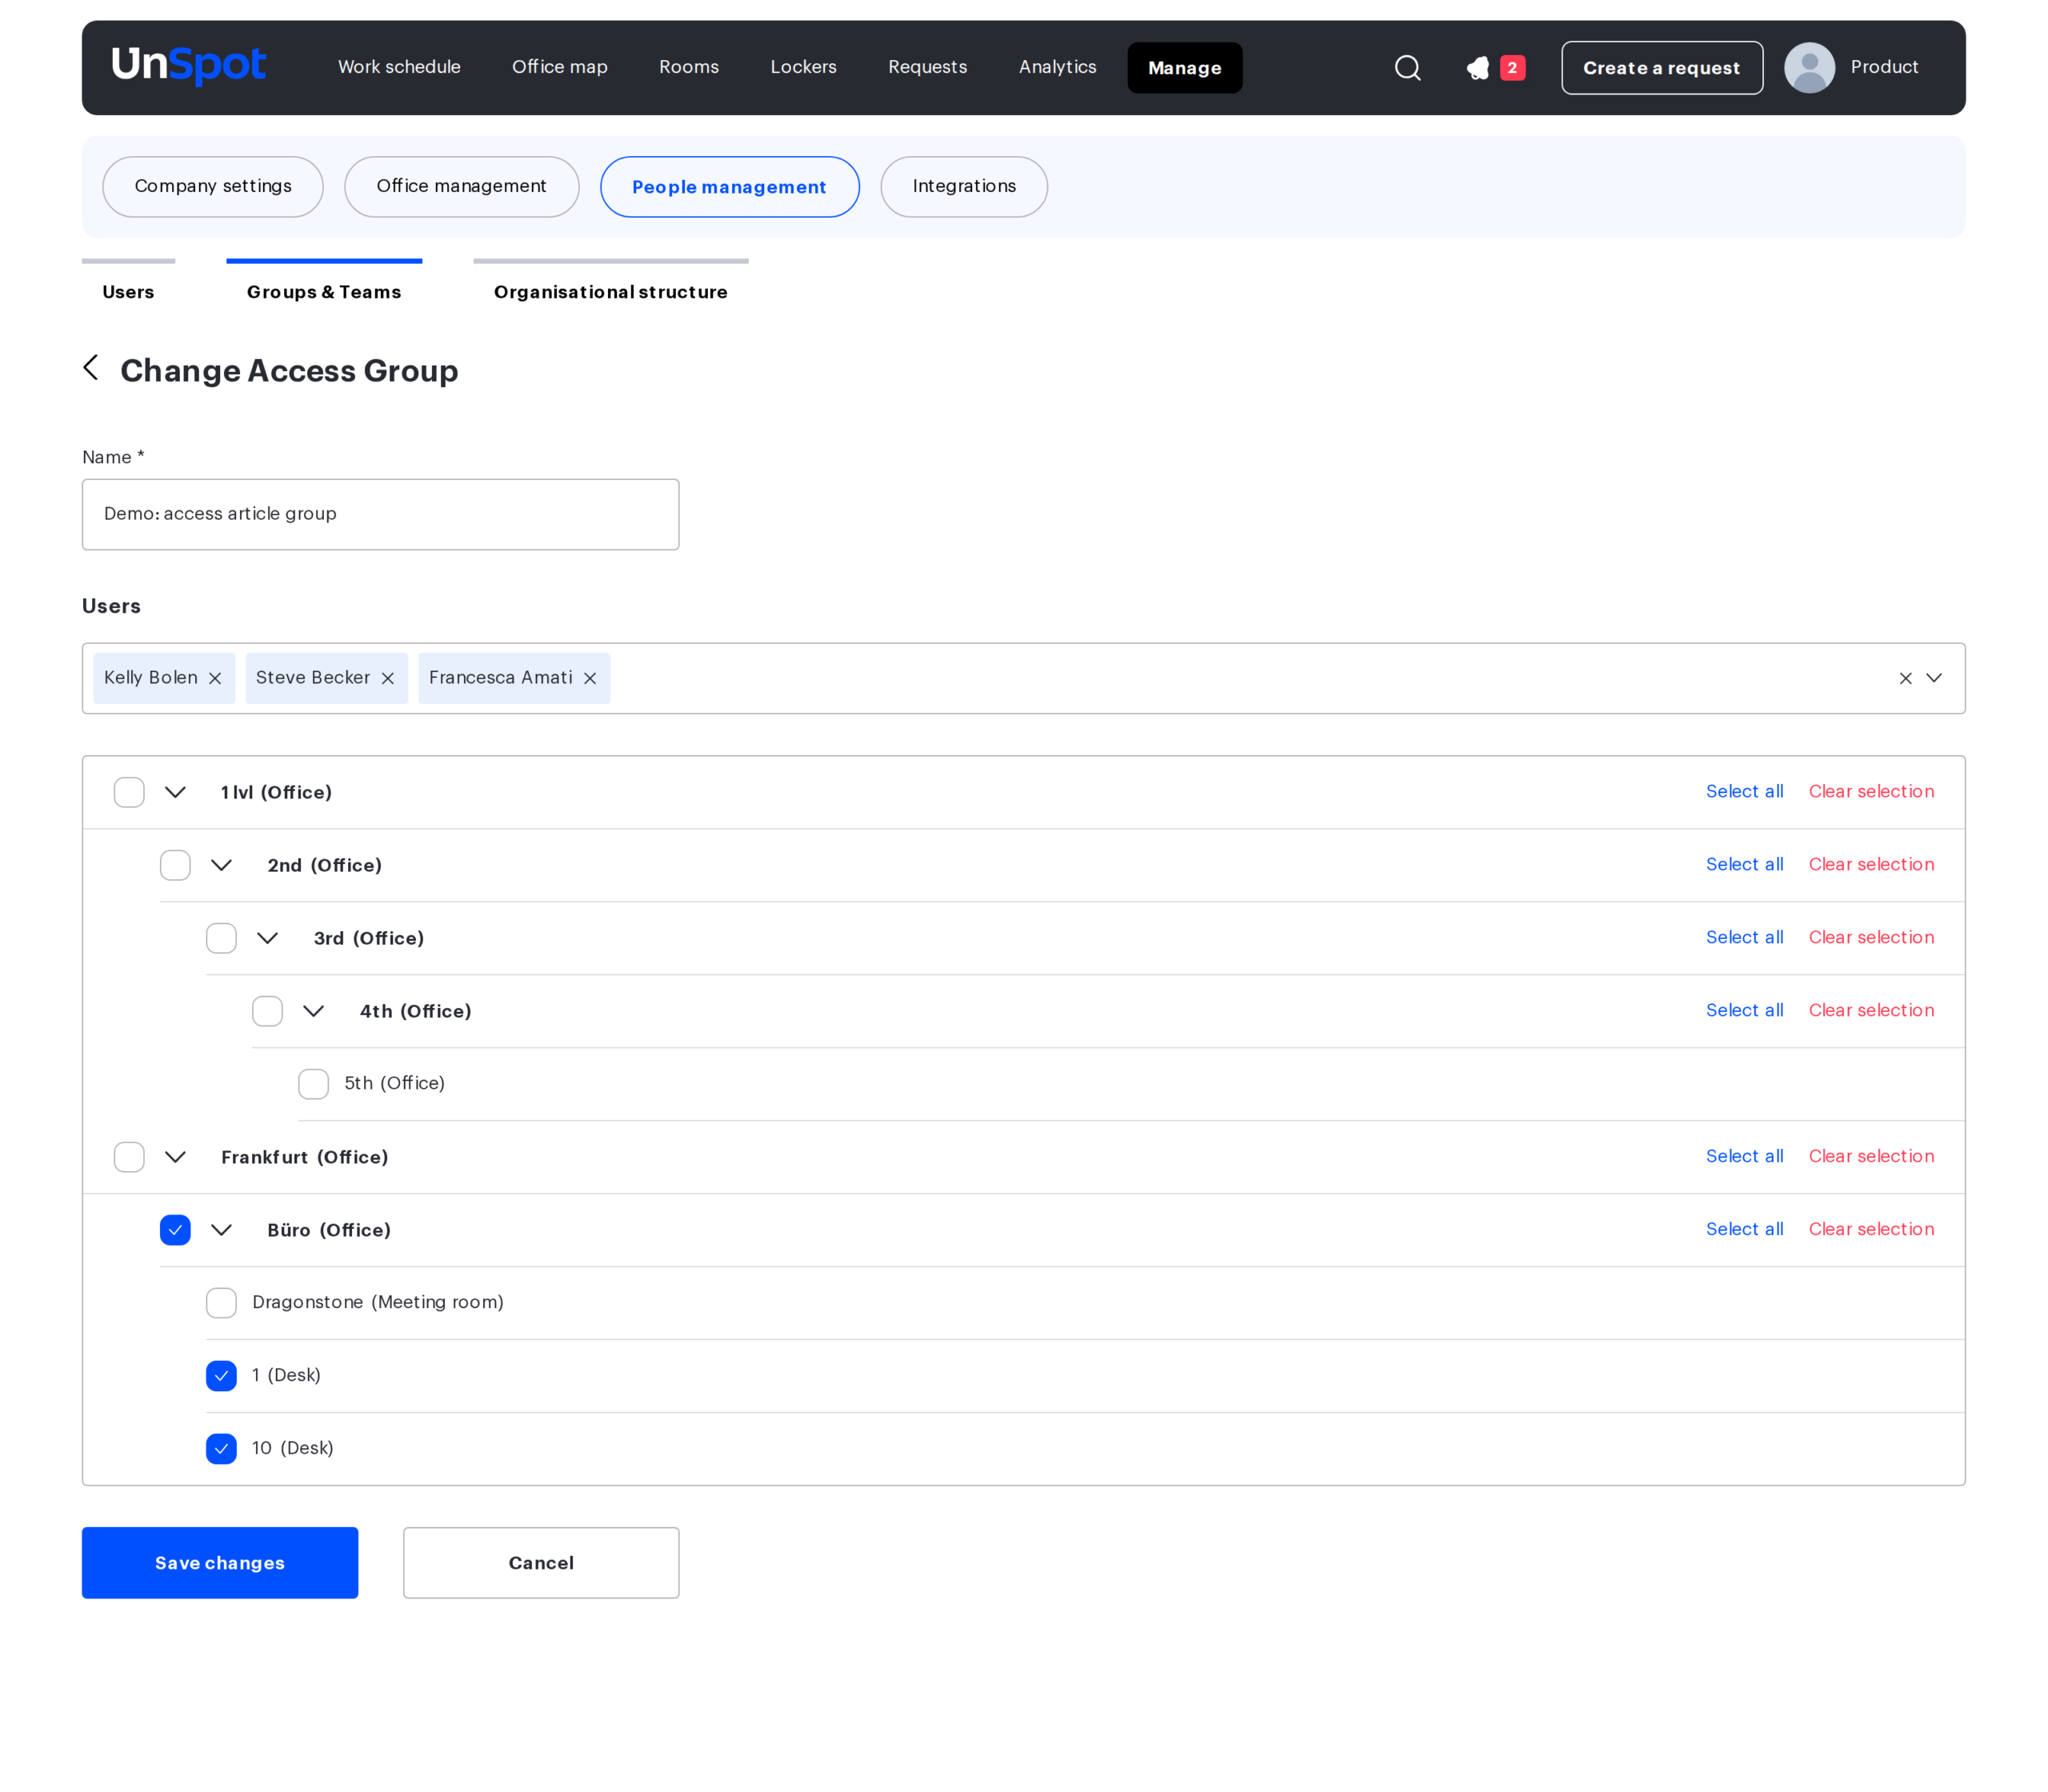
An object can be linked to a group from either side: from the group card (pick the objects) and from the object card itself (pick the groups). The result is the same.
Three options in the object card
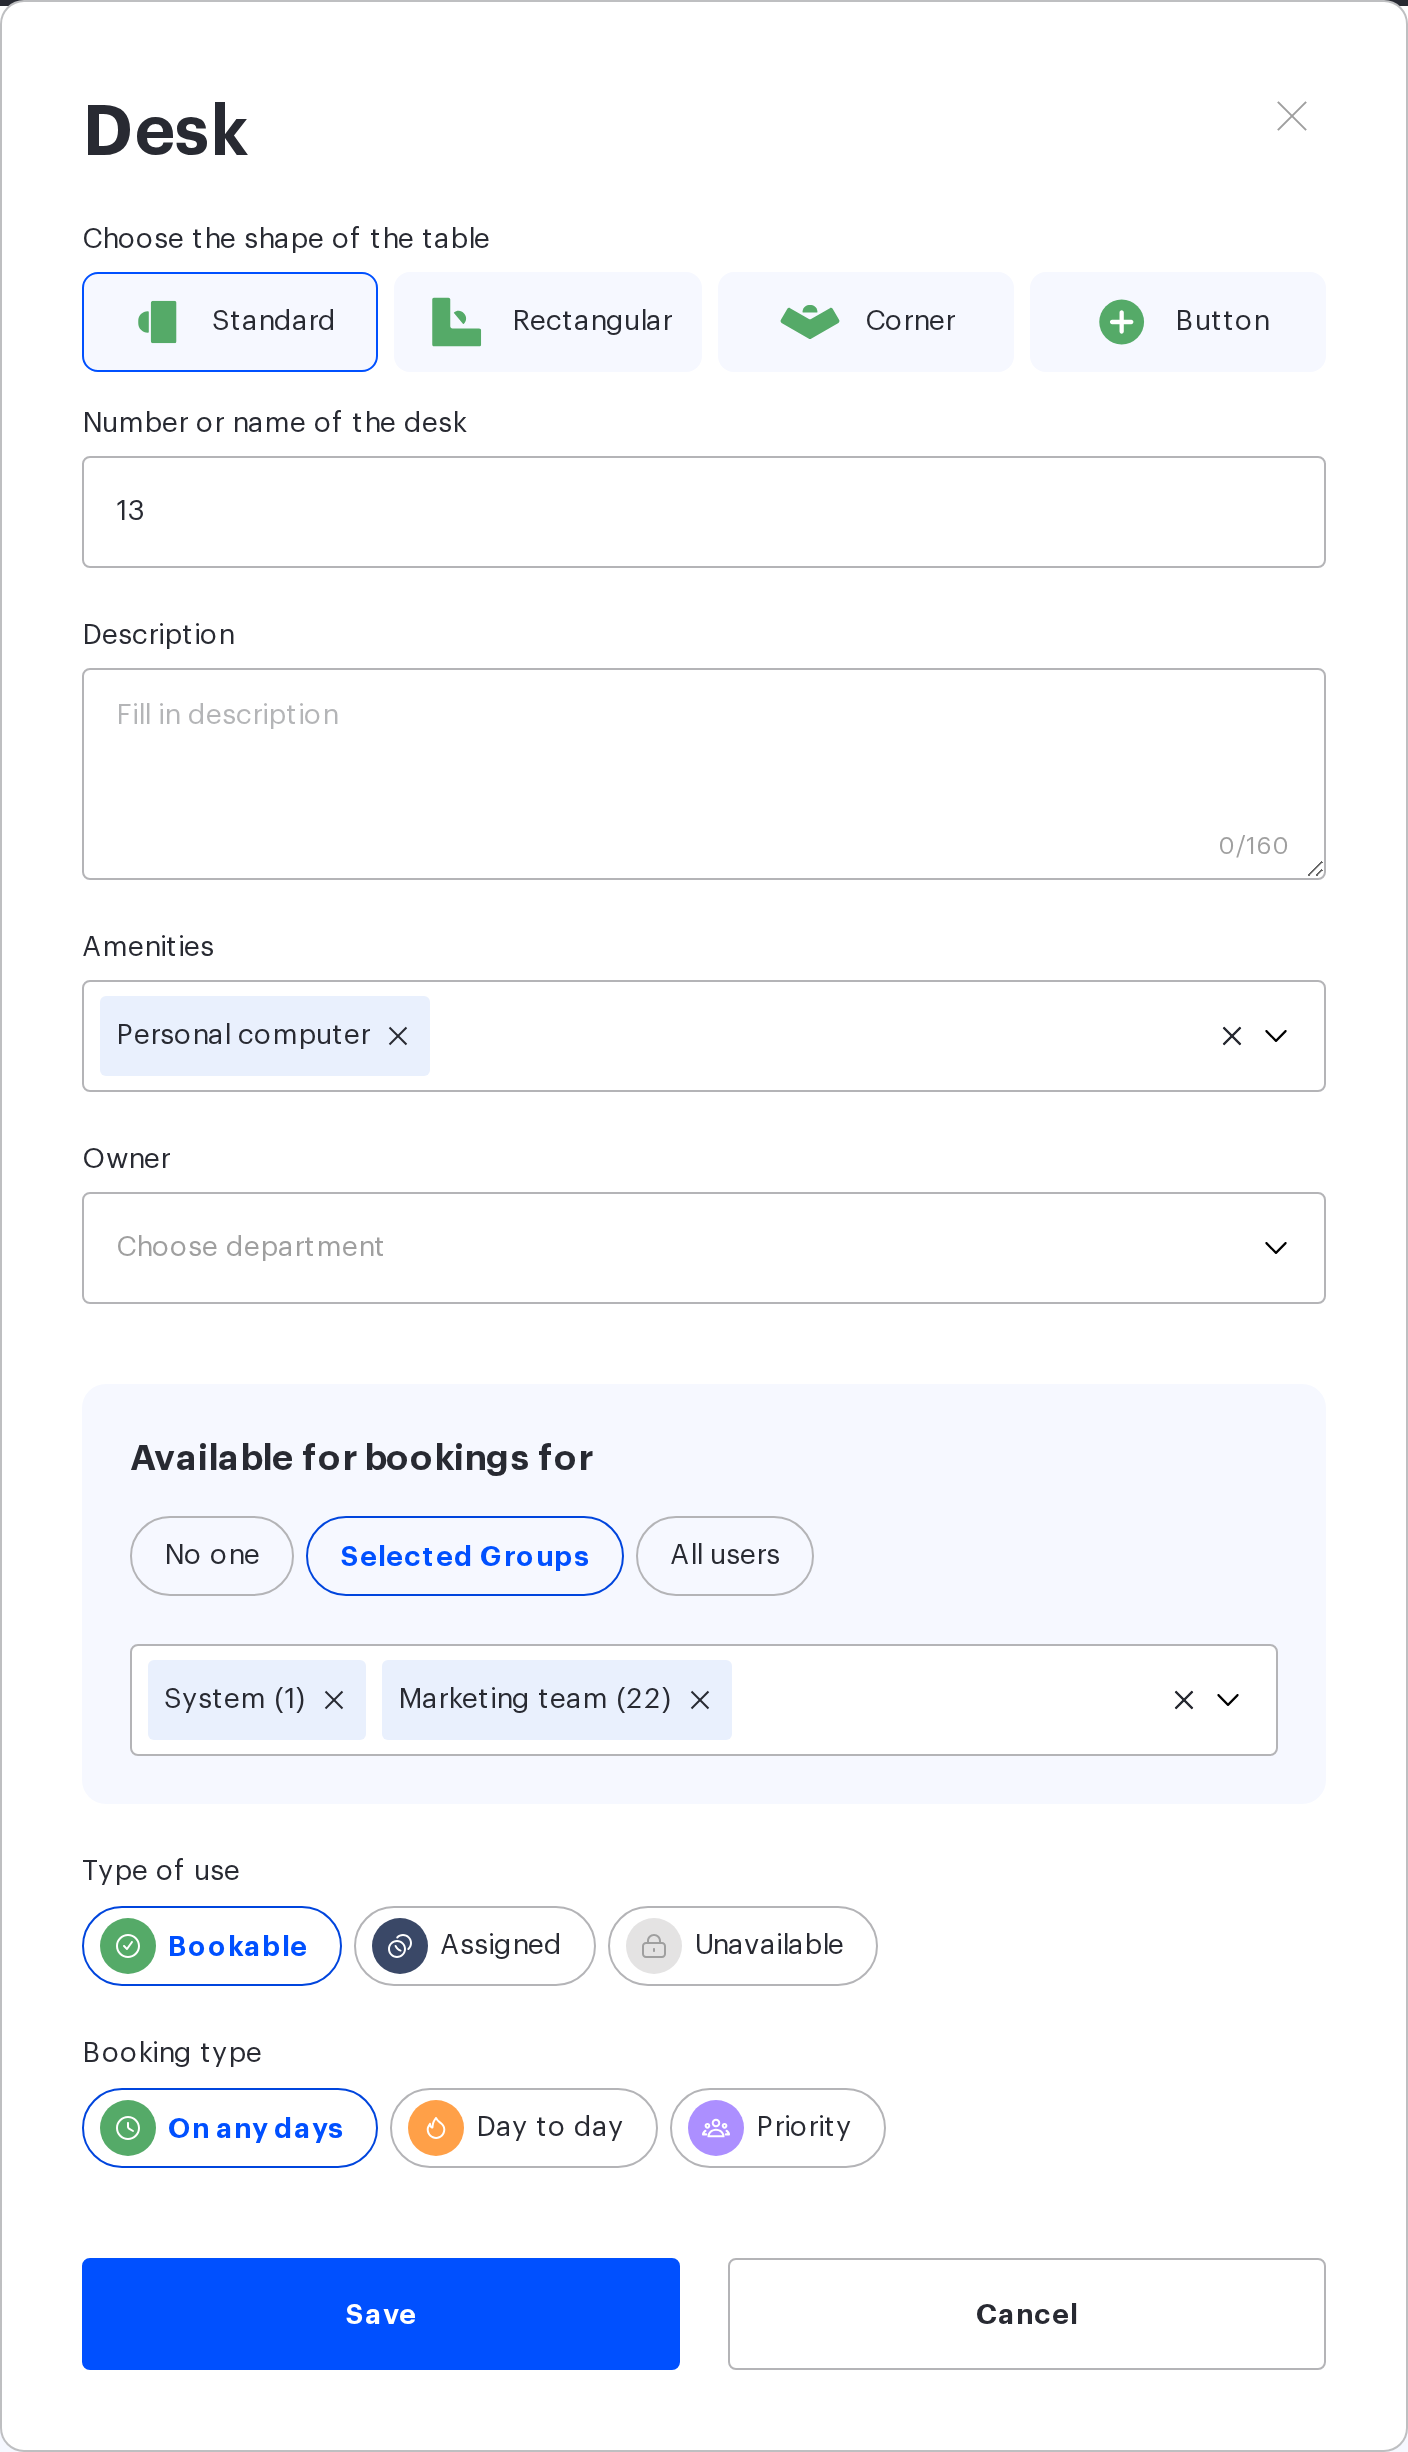
The card of a desk, a parking space, a meeting room and a locker has an “Available for bookings for” block with three buttons; a locker cell has the “Cell type” field and an “Access group” list instead. In the edit window of an office, a building and a floor the block is named the same way as on resources, while the office card view mode shows “Who can book” with the options “Nobody”, “Users from selected groups” and “All Users”.
| Option | What happens | When to choose it |
|---|---|---|
| All users | The object is linked to the built-in group that covers every employee in the company | Open resources, shared meeting rooms, guest zones |
| Selected Groups | The object is available to the members of the listed groups; there may be several groups | Department or team resources, restricted zones |
| No one | The object is left with no group links | When access is set by the owner or the assignment only |
“No one” is not a ban. The option removes the group setting but does not cancel the other two sources of access: the employees of the owner department and the assigned employees still get the resource. If the resource has to be taken out of booking entirely, there is a separate type of use for that — “Unavailable”.
The built-in groups: ALL USERS and System
Behind the “All users” option there is a real built-in group, created together with the company and shown first in the group list under the name ALL USERS. Its specifics:
- it cannot be deleted or renamed;
- its membership cannot be changed by hand: employees are not added to it, it counts everyone automatically, and the member counter shows every active employee in the company;
- the system will not let you name another group ALL USERS;
- it is not shown in the group selection list of an object card — the “All users” button is used instead.
The practical point: you do not have to maintain a “group for everyone” by hand and make sure new employees end up in it.
The second built-in group is System. It is created together with the company, cannot be deleted and is added by default to the access block of new objects — desks, meeting rooms, offices, cells: a new object is immediately open to its members unless the group is removed while creating it. The first company administrator and the employees arriving through user synchronisations join System automatically; the hint in the employee card calls its objects the “default resources”.
Rules worth knowing
- Groups add up. An employee may belong to several groups — they get the union of their objects. Rights do not intersect and are never narrowed down.
- Groups also add up with the other sources of access — the owner department and the assignment. No source cancels another.
- Access is not inherited down the space tree. Linking a group to a floor or a building does not grant access to the desks inside it: the resource has to be linked to the group separately. The reverse works more strictly: if the office is unavailable to the employee, its resources are not shown at all.
- There is no limit on group size — neither in the number of employees nor in the number of objects.
- Changing the group membership does not cancel existing bookings. An employee who lost access will not be able to create a new booking, but the existing one will stay. If it has to be cancelled, that is done separately.
- Synchronised groups that came from an external directory (Active Directory, Entra ID, SCIM) work exactly like the ones created by hand; their membership is overwritten by the synchronisation. Such a group cannot be deleted by hand — but it disappears on its own if it was deleted in the external directory.
- A group linked to a meeting room display cannot be deleted while it is the display’s only group — connect the display to another group first.
- The group name is unique within the company and limited to 255 characters.
Full and restricted access: typical schemes
| Task | How to build it | What to keep in mind |
|---|---|---|
| Full access to the whole office for everyone | “All users” on the office, on the floors and on every resource | The office setting does not extend to the resources inside: they have to be opened too |
| A floor for one department only | A department group linked to the floor and to every resource on that floor | New resources added later have to be linked to the group manually |
| Some resources open to everyone, some to a team | “All users” for the open ones, “Selected Groups” for the restricted ones | A resource may belong to several groups at once |
| A meeting room for executives only | A group with the right employees, linked to the meeting room | Meeting rooms have no other source of access — groups only |
| Parking for those who have a pass | A group with these employees, linked to the parking spaces | A car is required to book parking regardless of groups |
| A locker handed to a specific person | A group on the cell plus assigning the cell to the employee | With “No one” on the cell the assignment will not work — a group is required |
Groups in the employee card
The other side of the same setting is the “Access groups” block in the employee card: it shows which groups they belong to and lets you add them to a group without opening the group card.
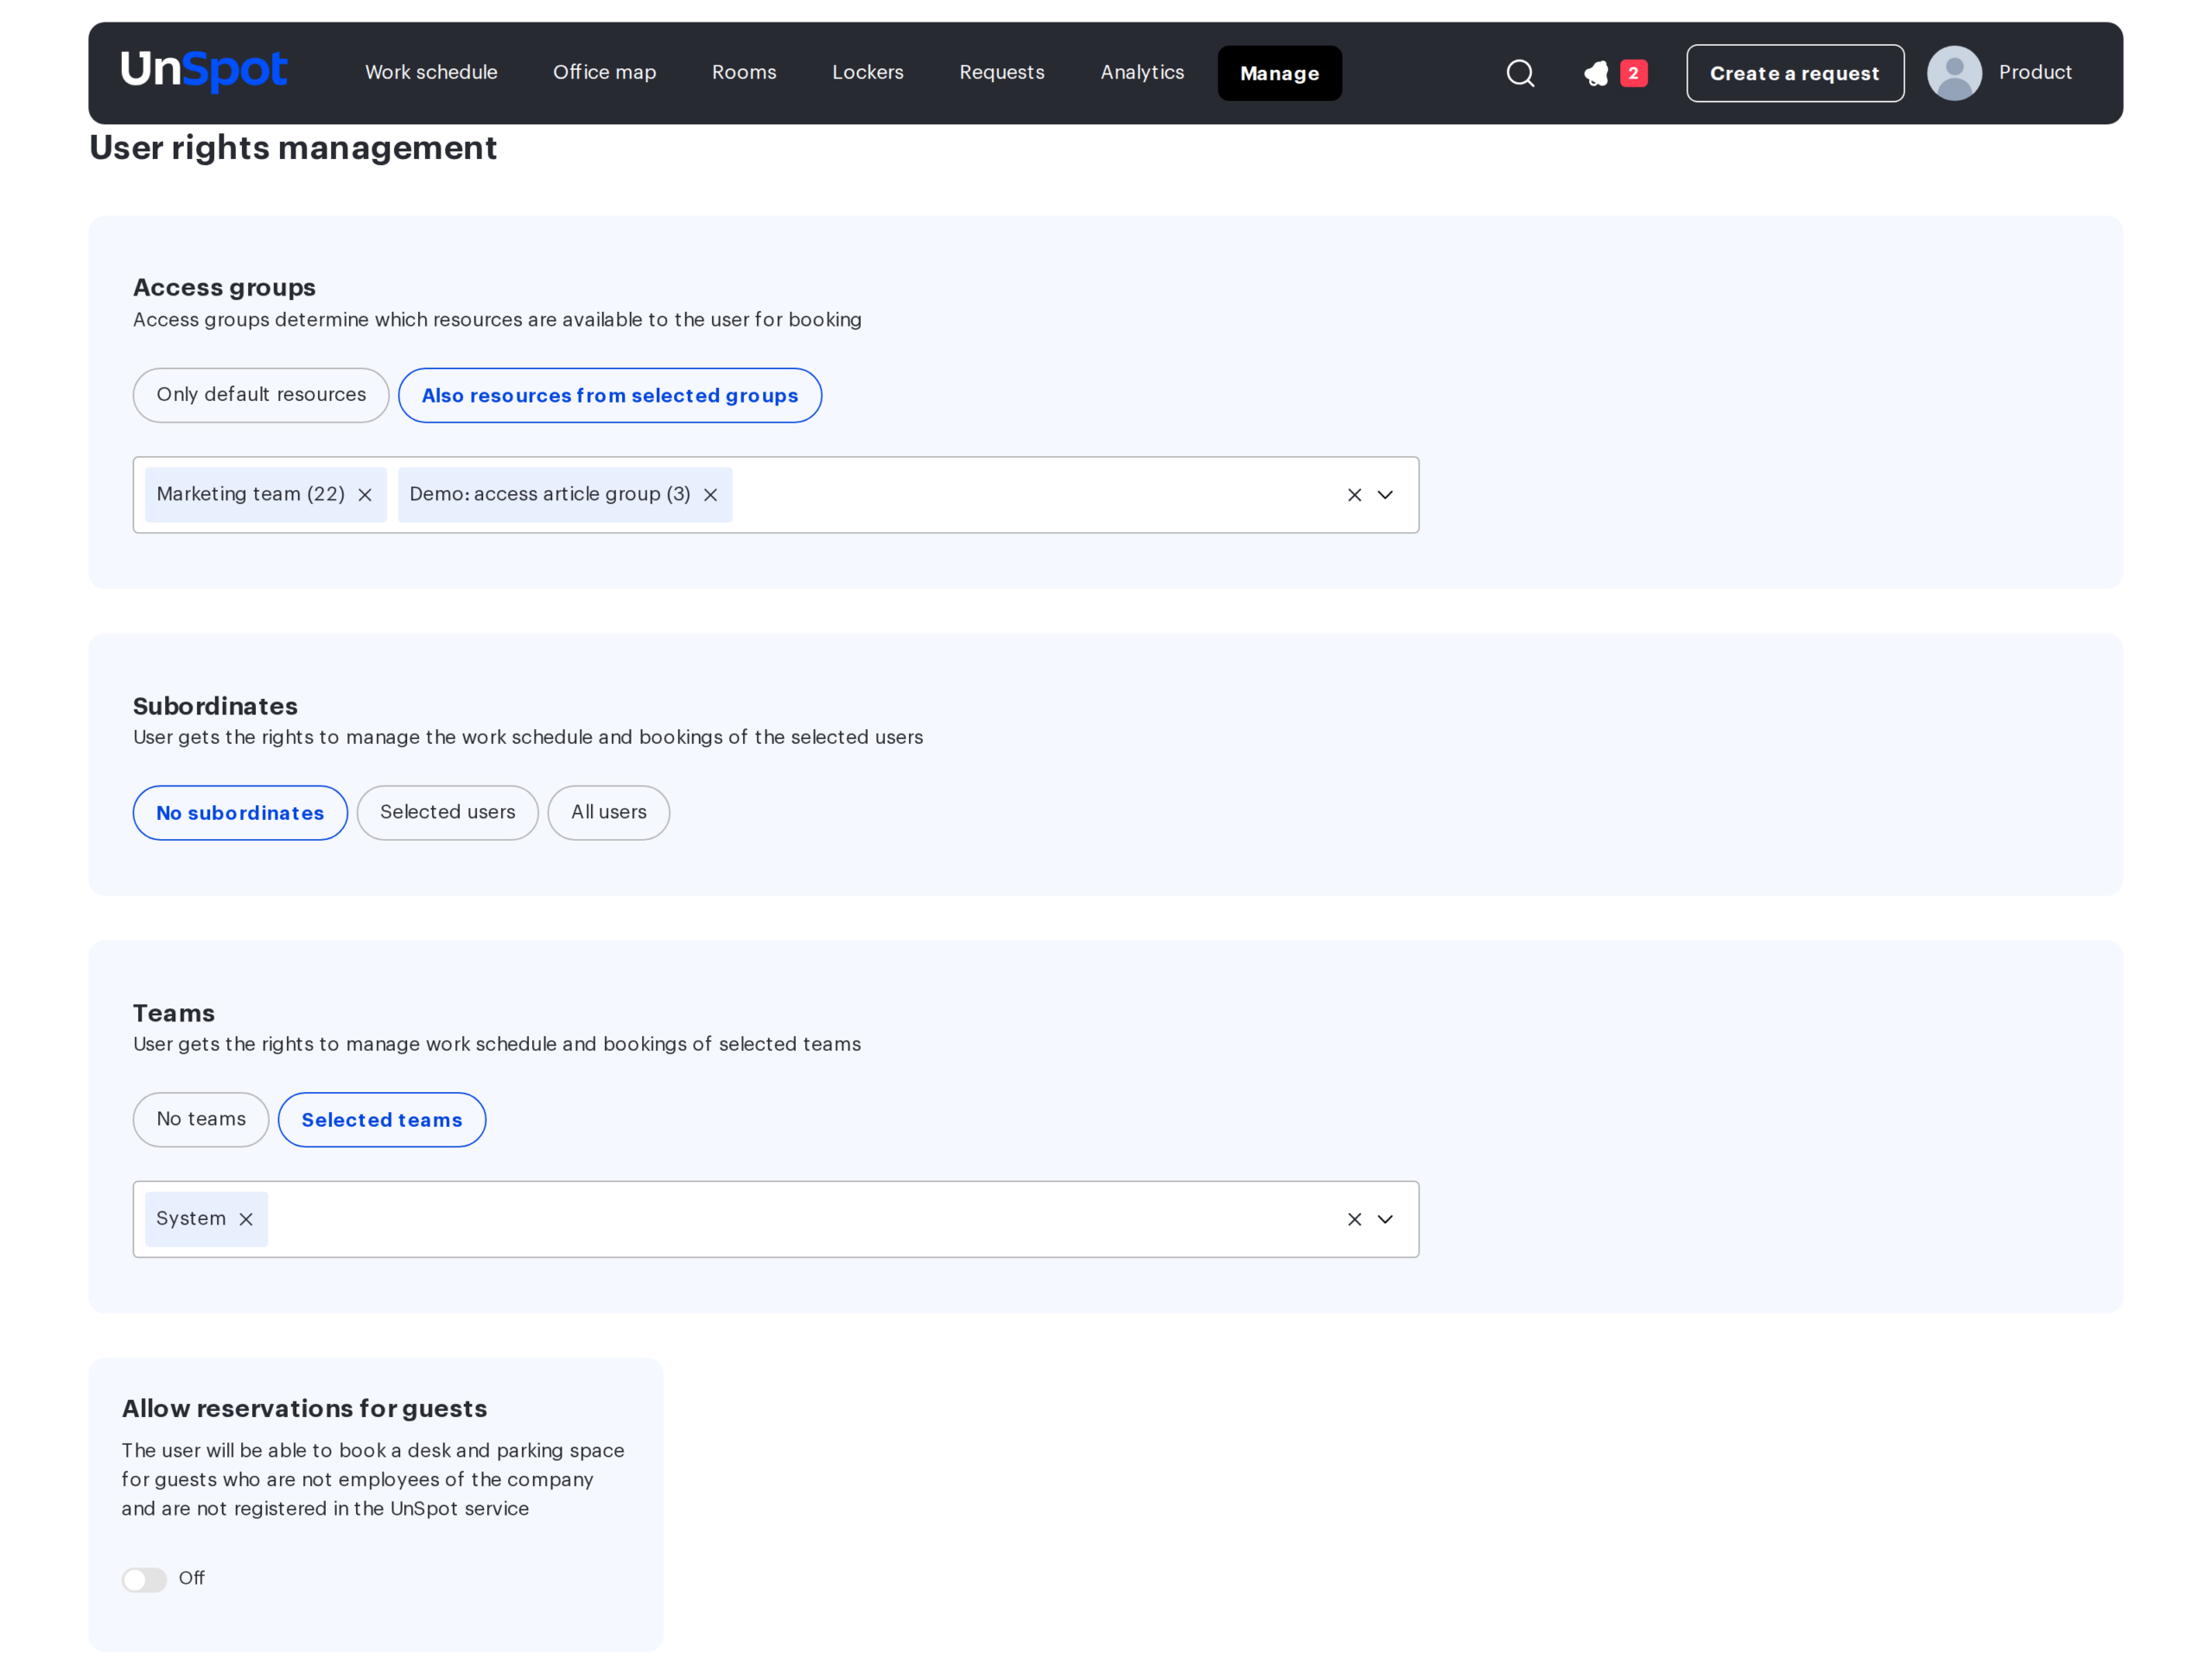
Two blocks that look similar sit next to it and have nothing to do with access: “Teams” makes the employee a manager of the selected teams, and “Subordinates” — of the selected employees; the interface hints describe it as the rights to “manage the work schedule and bookings”. “Teams” are the same groups from the “Groups & Teams” section: one group can grant access to its members and have managers at the same time. Workspace access cannot be configured through these blocks.
Who can configure groups
| Action | Available to |
|---|---|
| See the list of groups | Any employee — via the API and in selectors; the “Groups & Teams” page opens for the Super Administrator only |
| Create, edit and delete groups | Super Administrator and Users Administrator; the Users Administrator works through the employee card and the API — the section page opens for the Super Administrator only |
| Add and remove members | Super Administrator — in the group card; Users Administrator — through the employee card |
| Link objects to groups | Super Administrator and Offices Administrator — through the object card on the map |
Common mistakes
- The group is linked to the floor, but the resources are not. The most common reason for “the employee is in the group but sees no resources”. Check the link on the resources themselves.
- Expecting “No one” to close the resource. It only closes group access; the owner and the assignment keep working.
- Trying to restrict access through booking policies. Policies control the number of bookings, not who sees which resource.
- Checking on a Super Administrator account. Some limits do not apply to the Super Administrator and the Office manager — check on the account of a regular employee.
- Maintaining a “group for everyone” by hand. The “All users” button and the built-in ALL USERS group exist for that.
- The unnoticed System group on a new resource. It is added to the card by default: unless removed while creating the object, the resource is immediately open to all of its members.
Related articles
- Workspace access rights: overview — the entry point to this section
- How workspace access rights work
- Configuring resource access rights: all settings — the settings reference
- Workspace access through the organisational structure
- Assigned seats, priority and the booking horizon
- Subordinates and teams in the employee profile — the other role of the same group